Showing posts with label htv. Show all posts

8.09.2013

Our worst kept secret ever

Pregnancy related things are really hard for the hubby and I to keep secret.  Despite 5 miscarriages and a year of fertility treatments to conceive our first child, we still told everyone the second our home test showed up positive, even though almost everyone thought we were crazy not to wait a little bit (that almost kind of hurts- "hey, remember you might fail at this?").  We never regretted it though!

This time around, family & friends knew right away (in fact, I walked straight out of the bathroom, where I called my just-deployed husband, and over to my dad, and started spreading the news!) but we didn't post on Facebook until the ultrasound showed heartbeat.  Why?  I don't know.  Last time my sister actually spilled the Facebook-beans so maybe I would have waited last time too.  Facebook is weird like that.

One thing we tried really, really hard to keep secret is the new baby's name.  With our first, we knew from before we got pregnant what he would be if he was a boy or girl.  With this one, we still had the girl name, but no boy name.  Agreeing on one took months, but we did!  Then hubby decided we should keep it secret.

Secrets can be fun, although my mother in law now knows, since he can never resist her asking :) I thought of a really cool idea though.  What if the "baby announcement" hospital photo of screaming 10 minute old baby was also a name announcement for everyone else?  At least for the Facebook crew, who don't get up to the minute, super close family secret updates.

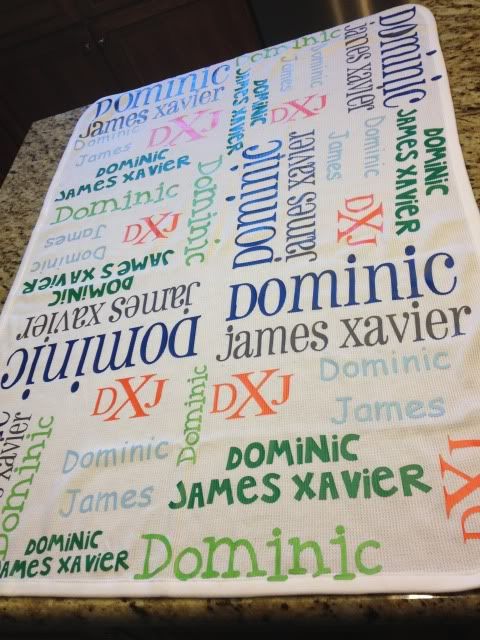
I set out to re-created a prop for a photo I saw.  And I am IN. LOVE.

I used my Silhouette Cameo to design the whole thing.  Simply resize the mat to whatever your blanket size is (this is 30 x 40 ") and design away.  I then copied the whole thing into a new file, split it up by color, and lined each color up on the mat one by one.  I cut them out of Siser Easyweed HTV (my favorite brand!), weeded & cut the words apart, and then re-created the whole thing on the blanket.  I pressed with my iron and parchment paper (no fancy heat press or teflon sheet here- I think I'm proof that you don't need tons of $$$ equipment to make something awesome!) and total pressing time was about 20 minutes.  I spent extra time going back and forth since the blanket is a waffle weave and I wanted to make sure the HTV really got in there.

So, blog-land friends, please be honored that you now know the name of our soon-to-be-born son!  I can't wait to swaddle him in this blanket and post a photo.

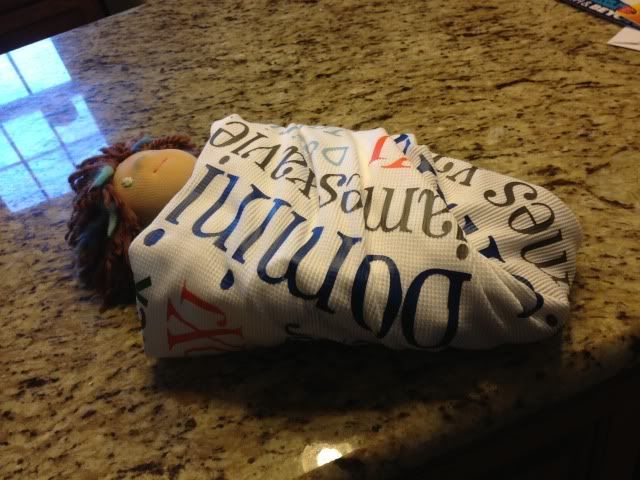
I did try to take a photo of how this would look as a swaddle, but a 14" doll (even my preemie first-born was 17.5"....) whos arms naturally stick out to the sides did not make the best model.  I don't have anything else to use though!  Oh well :)  It'll be on my son one month from today!

I got some questions about the design process so let me show you some screenshots.

Here we have the design mat resized to the blanket size, which is 30" wide and 40" long.  Ignore the red box- that is showing you where the 12x24 cutting mat is.  These are all free fonts from around the web.  


Once that was done (using lots of duplication, resizing, and moving things around) I copied it into a new file and started to split it up by color.  My HTV sheets are 12" x 15" so I resized my mat for those.  You can see here that some colors took 2 sheets- some took 1/4 of one.  It varies.  Anyway, I didn't show it with this screenshot, but don't forgot- MIRROR BEFORE YOU CUT HTV!  Mirror your image!  Select it and hit "flip horizontally."  Also, remember HTV goes on your cutting mat shiny side DOWN!  :)

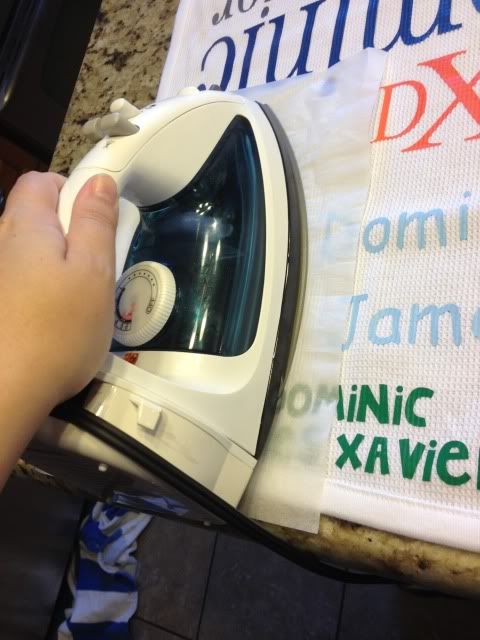
When I make something with HTV I get asked a LOT about the pressing process.  I don't own a heat press or a teflon sheet.  My iron is from walmart.  It goes from 1-6, temperature-wise, so I set it on 6.  

I press in two stages.  First, I use parchment paper over the HTV with it's little carrier sheet (the shiny sheet) attached.


Next, I remove the carrier sheet, put the parchment paper back down (VERY IMPORTANT!  DO NOT IRON OVER HTV DIRECTLY!) and press it again.  I do about 15-45 seconds of pressing over each area each time.

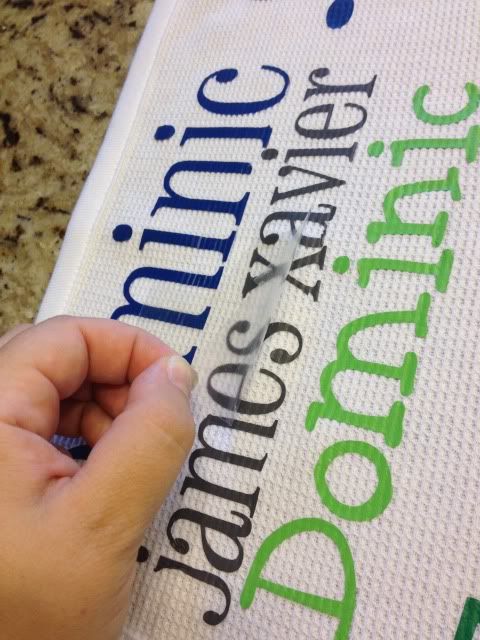
Here's me removing the carrier sheet after the first press.  The HTV is adhered, but I think the 2nd parchment-paper-only step really helps it adhere well (especially on textured fabrics like this.


I hope that helps some of you who like me don't want to drop $200+ on a heat press, or even $10 on a telfon sheet- I've never felt the need! :)

7.17.2013

Using Printable HTV (heat transfer vinyl) for dark colors with the Silhouette Cameo

I loooove to make shirts using HTV (heat transfer vinyl) and my favorite brand is Siser Easyweed.  My least favorite is the Silhouette brand...it's awful.  Anyway, as easy as it is to layer Siser Easyweed, sometimes you have projects that just don't work with the limited colors offered, or maybe you want a photo to be ironed on your shirt, or something.  That's where printable HTV comes in.  I have used and liked both Jolee's and Transfermations brands, and been less impressed with the Silhouette brand, though it's not terrible.  As a general rule I like to use the ones made for dark colors even on light colored clothing as it's way more vivid and just looks better in my opinion.

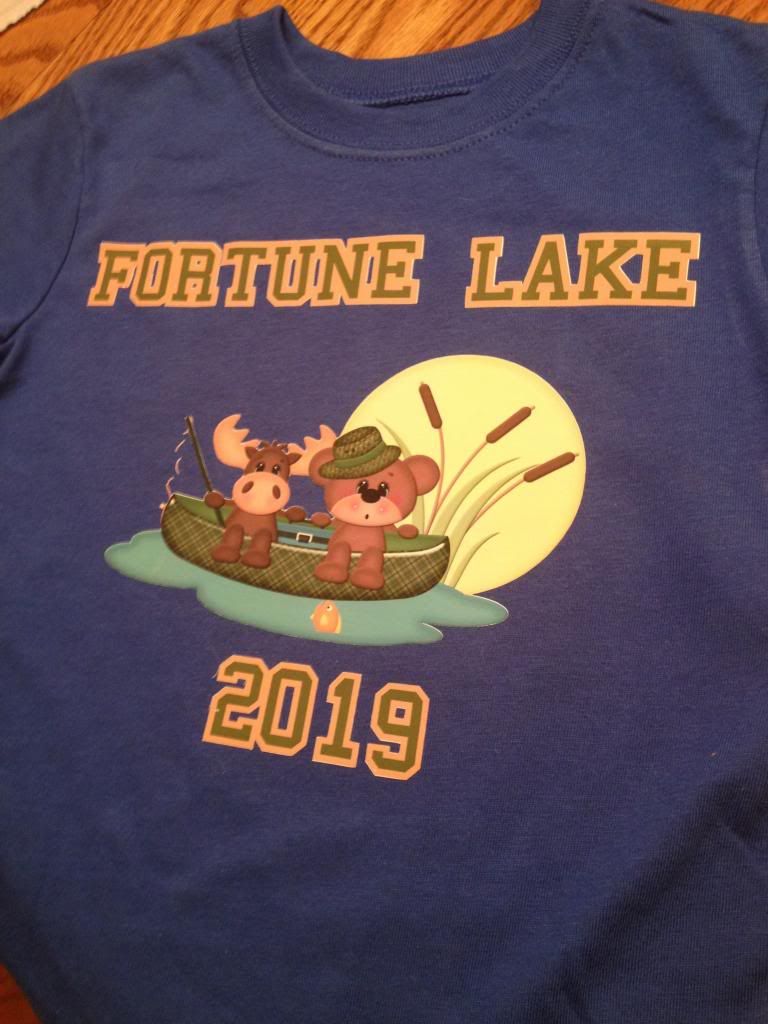
For this shirt I used Transfermations for dark colors.  I either got it at Michael's, Staples, or Walmat, not 100% positive on which.

Normally when you use HTV and even HTV for light colors, you need to mirror the image before you cut.  You do not need to mirror the image with HTV for dark colors.  I'd always read your instructions to be sure but I've used several brands and none require this.

First, get your image all ready in Silhouette Studio.  Get your cut lines situated- if you layered some elements you may need to highlight them and hit "Cut Edge" or whatever works for you.  Do not mirror it!  Turn on registration marks and print it.  I use "Best" settings for quality.  You have to use an Inkjet printer.  If you've found a brand that works with a laser printer, please share!  I've never seen one.

Once it's printed, stick it on your mat and load it into your Cameo.  Have your machine scan the registration marks and get your cut settings ready.

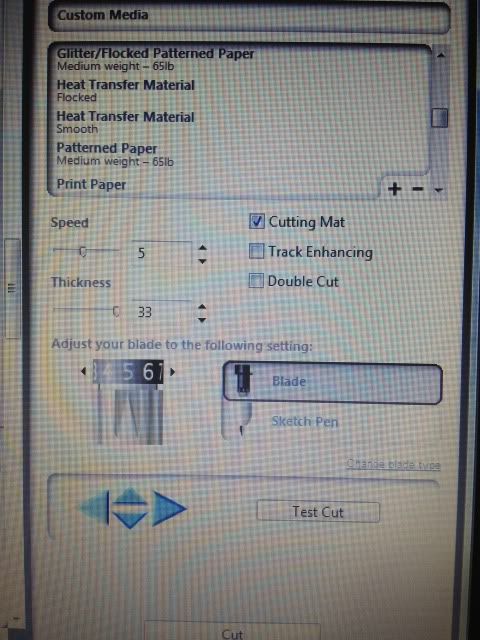
Here's a snap of what settings I use.  I set it to "Flocked HTV" and then change the blade to 5.  That's why it says Custom Media.  ***Note- I get a lot of use out of my blades, but when I switched to a new one, I only had to use HTV Smooth settings, blade on 1!  Big difference!****


Have your machine cut.  You're basically doing Print & Cut, easy, right?  I love Print & Cut and it's the biggest reason I bought my Cameo.

Once your design is cut, you then remove it from it's backing paper.  You'll see that this stuff feels more like Siser Easyweed and not regular printable HTV.

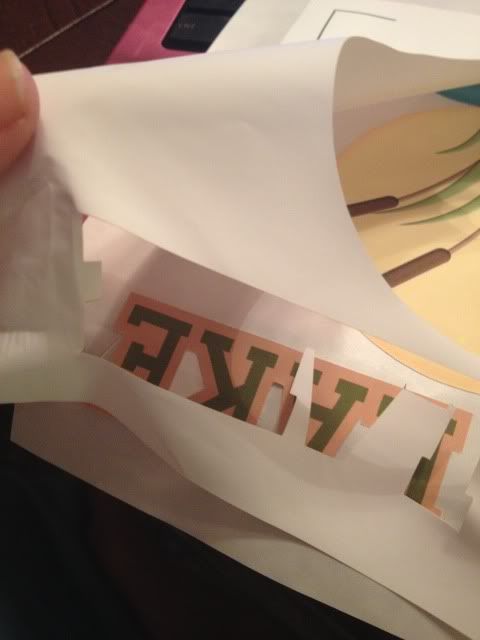
Here's me just peeling up the corner and removing all the excess white- the backing paper does not cut, see it?  I did rip it a little when grabbing that corner but it's almost like the carrier sheet of Siser Easyweed (except not used as such- just that you don't cut that paper, just your HTV.  A kiss cut.  Anyway..)


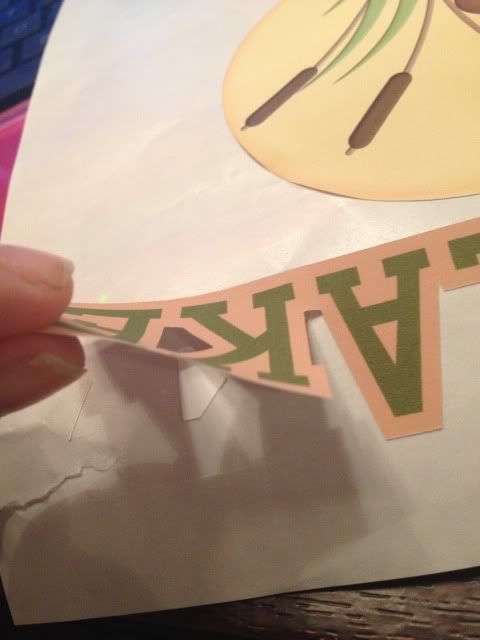
Aaand here's me peeling my design off the backing paper.  This is the one thing I don't like.  Unlike Siser Easyweed which is on a carrier sheet, I have to line up all these elements by hand separately on the t-shirt and yeah, they end up off center sometimes.  I'm working on that.  Practice makes perfect!

See how it weeds itself in between letters and stuff?  It's pretty nifty.

Your next step is to line everything up on your shirt (iron it first, but let it cool before you start re-arranging stuff on it) and when it's to your liking, grab a sheet of parchment paper.  I've always had 1-2 sheets included in whatever pack of dark color printable HTV I buy, and it lasts for several sheets.

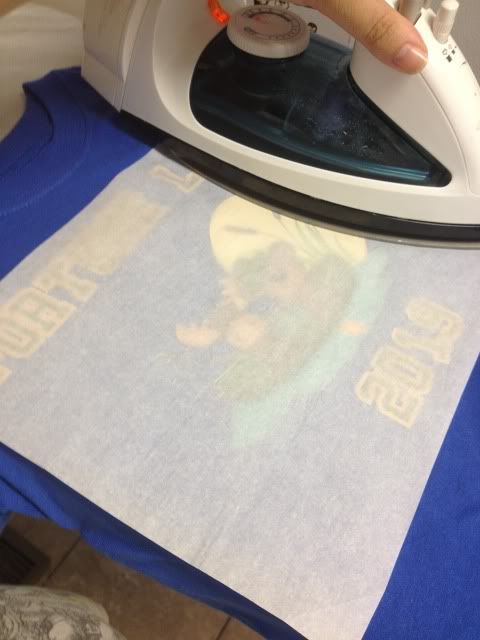
Place that over your design- careful, don't jostle anything- and iron.  My iron goes from 1-6 so I set it on 6, no steam, and press really hard for 20 seconds.  Then I pick it up, move it, press again, until I've done the whole design.  The instructions do say not to drag your iron but to pick up and move it.


When I'm done I just lift the parchment paper- unlike the Siser Easyweed carrier sheets, it's not going to be sticky to your shirt or anything- and voila, shirt!

This IS a classic example of me arranging things crooked and/or off center, but on a wiggly 3 year old, it's not very noticeable :) With Siser Easyweed and it's sticky sheets I normally line everything up on the floor and then step back and look at it, and then I can just pick up the shirt and move it to the ironing board, but you can't do that with this stuff- no carrier sheet.  My only pet peeve.

You'll also probably notice that the fishing line is missing some pieces- in removing the design from the backing that part was just too thin and I went too fast, but oh well.  It is what it is.  This is a tiny shirt for a tiny little toddler.


I always wash inside out, and never iron on the design itself, but other than that, I've found this stuff to be very durable!


1.21.2013

Happy 3rd Birthday to Vivi!

My good friend Val has a little girl who was born right around Frankie's original due date.  Vivi is the cutest thing ever and when Val asked me to make her some birthday gear I jumped at the chance to play with pink for a change!

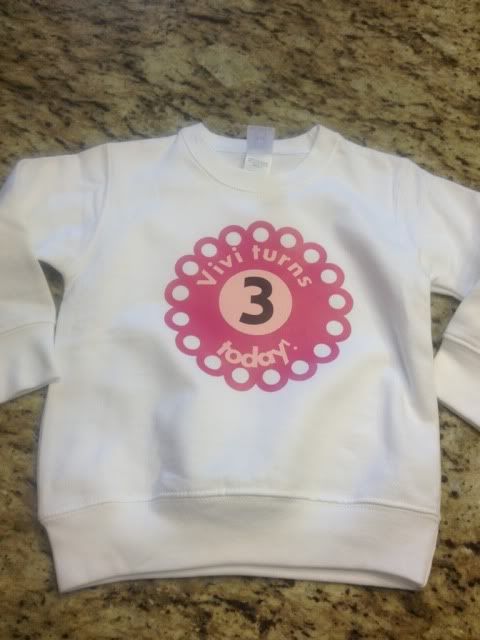
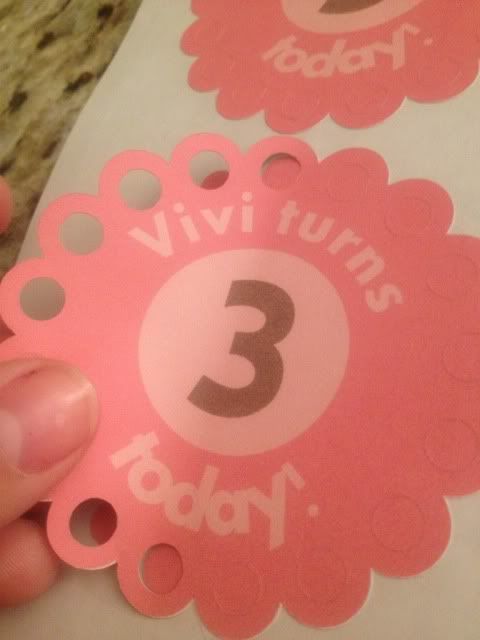
Val had already found a picture that she liked, and using some scalloped circle shapes from the Silhouette Store we put this little design together.  Val tweaked it a bit, most noticeably adding the second circle around the "3," and then asked for matching stickers.  Those were really easy as long as I made sure that the only cut lines set were those of the scalloped circle and nothing inside!

Front of shirt

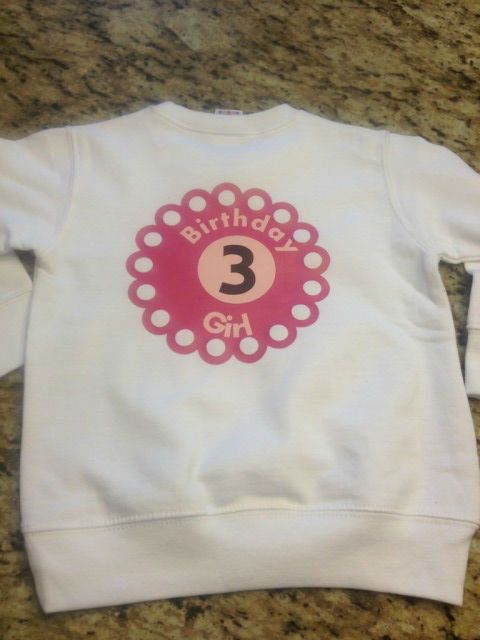
Val wanted a similar design on the back:

I don't know why it looks so oddly off center.  Bump in the shirt maybe?  I swear it's straight!:p

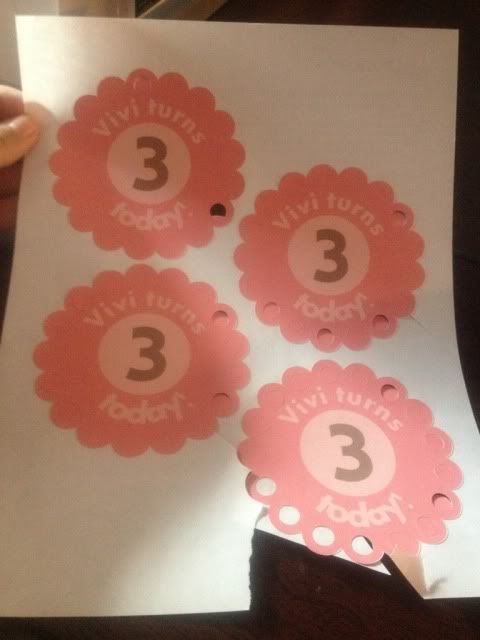
She also asked for matching stickers.  She is going to put them on party hats- how cute is that???  And some extra for people to wear like a normal sticker.  I even sent her some extra large stickers for decorating.  If I had a girl I would stick them on a vase, fill the vase with candy, and some pink flowers...ok, enough dreaming of pink!

I ran into two issues during stickers, and I fixed them both, which is why I'm sharing.

First issue- sticker paper settings on the Cameo are too rough.  So are vinyl settings.  I did not want the blade to cut through the backing paper.  I wanted a kiss cut, which is where the sticker is cut but the backing is intact, like a sheet of stickers.


I finally fixed this problem using the settings:  Blade: 1, Speed: 6, Thickness: 8.


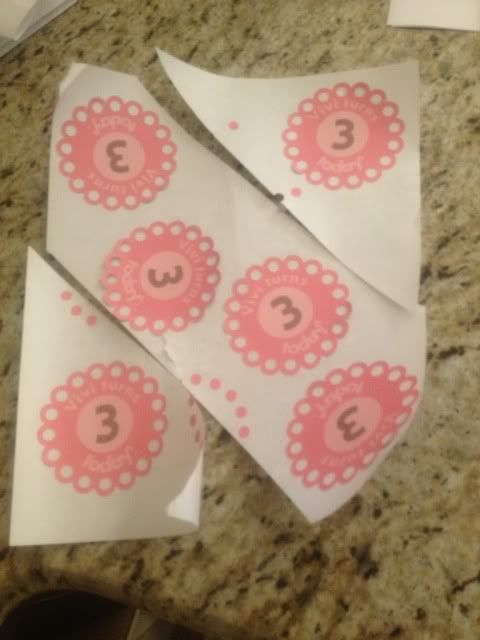
I was so happy to see that fixed, but I then realized that this sticker paper was split in two places down the back, I'm assuming to make it easier to remove stickers?  Well, these stickers were getting mailed to Disney World, not used right away.

Stickers that I repositioned to be around the splits in the backing paper...


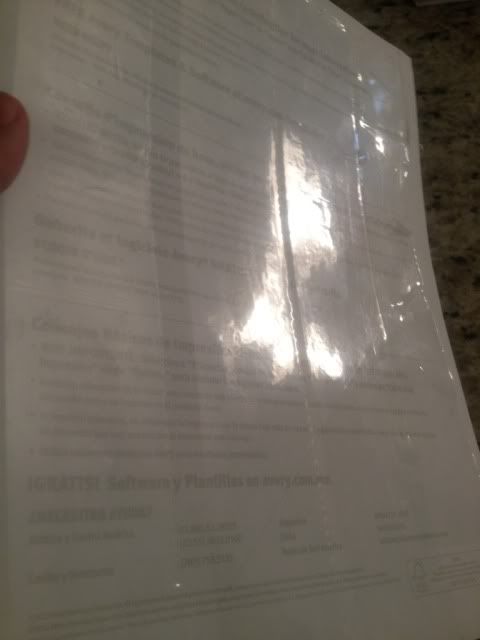
My fix was pretty simple.  After printing but before cutting, I put strips of packing tape down the back.


This worked like a charm.  The paper no longer split apart once I weeded the extra sticker paper from around the stickers, and as a bonus it didn't stick to the Cameo mat quite as badly.  My mat is fairly new and still sticky enough that if I'm not careful, it will rip paper when I try to remove it from the surface.

I hope Vivi has a great birthday!!!  I will update with pictures of the party hats and anything else that got the sticker treatment :)


1.03.2013

3rd Birthday T-shirt

Someone is turning THREE years old over here! Where did the time go???!!!

I wanted to make him a t-shirt to wear to preschool on his birthday. I already had a black t-shirt and bought some Jolee's heat transfer paper for colored fabrics. I then wasted 2 sheets of it as my Cameo would not cut the design properly.

 I switched to some flat (regular) and flocked (thicker and kind of fuzzy). A lot of people don't like the flat HTV that Silhouette makes. I can see why. It cut ragged and it stretched when weeding, meaning again I trashed the cut.

However, the flocked HTV cut great!

 I had some Siser Easyweed left over from a shirt I made for my husband. It wasn't a color that I wanted to use but it was all I had left. I did end up liking the final product.

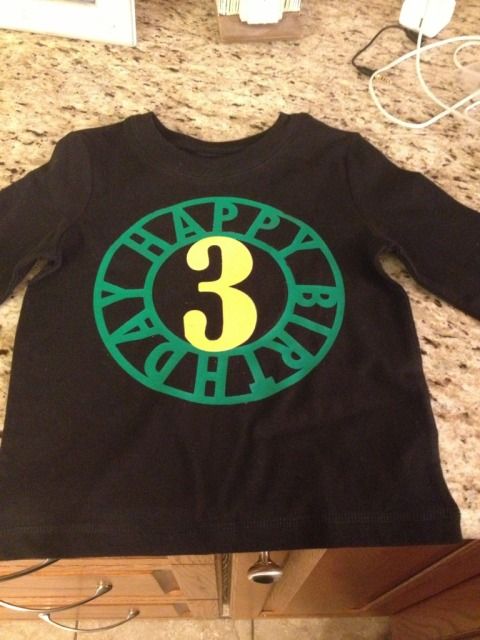
The green is Siser Easyweed and the yellow is the flocked Silhouette HTV.


I tried to take a photo of the flocked vs flat as well
Uploaded from the Photobucket iPhone App

I have a few other crafts to post, a lot to do, and even a bunch of stuff for What I Wore Wednesday- shocking, I know!

Thanks for reading, as always!
Showing posts with label htv. Show all posts

8.09.2013

Our worst kept secret ever

Pregnancy related things are really hard for the hubby and I to keep secret.  Despite 5 miscarriages and a year of fertility treatments to conceive our first child, we still told everyone the second our home test showed up positive, even though almost everyone thought we were crazy not to wait a little bit (that almost kind of hurts- "hey, remember you might fail at this?").  We never regretted it though!

This time around, family & friends knew right away (in fact, I walked straight out of the bathroom, where I called my just-deployed husband, and over to my dad, and started spreading the news!) but we didn't post on Facebook until the ultrasound showed heartbeat.  Why?  I don't know.  Last time my sister actually spilled the Facebook-beans so maybe I would have waited last time too.  Facebook is weird like that.

One thing we tried really, really hard to keep secret is the new baby's name.  With our first, we knew from before we got pregnant what he would be if he was a boy or girl.  With this one, we still had the girl name, but no boy name.  Agreeing on one took months, but we did!  Then hubby decided we should keep it secret.

Secrets can be fun, although my mother in law now knows, since he can never resist her asking :) I thought of a really cool idea though.  What if the "baby announcement" hospital photo of screaming 10 minute old baby was also a name announcement for everyone else?  At least for the Facebook crew, who don't get up to the minute, super close family secret updates.

I set out to re-created a prop for a photo I saw.  And I am IN. LOVE.

I used my Silhouette Cameo to design the whole thing.  Simply resize the mat to whatever your blanket size is (this is 30 x 40 ") and design away.  I then copied the whole thing into a new file, split it up by color, and lined each color up on the mat one by one.  I cut them out of Siser Easyweed HTV (my favorite brand!), weeded & cut the words apart, and then re-created the whole thing on the blanket.  I pressed with my iron and parchment paper (no fancy heat press or teflon sheet here- I think I'm proof that you don't need tons of $$$ equipment to make something awesome!) and total pressing time was about 20 minutes.  I spent extra time going back and forth since the blanket is a waffle weave and I wanted to make sure the HTV really got in there.

So, blog-land friends, please be honored that you now know the name of our soon-to-be-born son!  I can't wait to swaddle him in this blanket and post a photo.


I did try to take a photo of how this would look as a swaddle, but a 14" doll (even my preemie first-born was 17.5"....) whos arms naturally stick out to the sides did not make the best model.  I don't have anything else to use though!  Oh well :)  It'll be on my son one month from today!


I got some questions about the design process so let me show you some screenshots.

Here we have the design mat resized to the blanket size, which is 30" wide and 40" long.  Ignore the red box- that is showing you where the 12x24 cutting mat is.  These are all free fonts from around the web.  


Once that was done (using lots of duplication, resizing, and moving things around) I copied it into a new file and started to split it up by color.  My HTV sheets are 12" x 15" so I resized my mat for those.  You can see here that some colors took 2 sheets- some took 1/4 of one.  It varies.  Anyway, I didn't show it with this screenshot, but don't forgot- MIRROR BEFORE YOU CUT HTV!  Mirror your image!  Select it and hit "flip horizontally."  Also, remember HTV goes on your cutting mat shiny side DOWN!  :)

When I make something with HTV I get asked a LOT about the pressing process.  I don't own a heat press or a teflon sheet.  My iron is from walmart.  It goes from 1-6, temperature-wise, so I set it on 6.  

I press in two stages.  First, I use parchment paper over the HTV with it's little carrier sheet (the shiny sheet) attached.

Next, I remove the carrier sheet, put the parchment paper back down (VERY IMPORTANT!  DO NOT IRON OVER HTV DIRECTLY!) and press it again.  I do about 15-45 seconds of pressing over each area each time.

Here's me removing the carrier sheet after the first press.  The HTV is adhered, but I think the 2nd parchment-paper-only step really helps it adhere well (especially on textured fabrics like this.


I hope that helps some of you who like me don't want to drop $200+ on a heat press, or even $10 on a telfon sheet- I've never felt the need! :)

7.17.2013

Using Printable HTV (heat transfer vinyl) for dark colors with the Silhouette Cameo

I loooove to make shirts using HTV (heat transfer vinyl) and my favorite brand is Siser Easyweed.  My least favorite is the Silhouette brand...it's awful.  Anyway, as easy as it is to layer Siser Easyweed, sometimes you have projects that just don't work with the limited colors offered, or maybe you want a photo to be ironed on your shirt, or something.  That's where printable HTV comes in.  I have used and liked both Jolee's and Transfermations brands, and been less impressed with the Silhouette brand, though it's not terrible.  As a general rule I like to use the ones made for dark colors even on light colored clothing as it's way more vivid and just looks better in my opinion.

For this shirt I used Transfermations for dark colors.  I either got it at Michael's, Staples, or Walmat, not 100% positive on which.

Normally when you use HTV and even HTV for light colors, you need to mirror the image before you cut.  You do not need to mirror the image with HTV for dark colors.  I'd always read your instructions to be sure but I've used several brands and none require this.

First, get your image all ready in Silhouette Studio.  Get your cut lines situated- if you layered some elements you may need to highlight them and hit "Cut Edge" or whatever works for you.  Do not mirror it!  Turn on registration marks and print it.  I use "Best" settings for quality.  You have to use an Inkjet printer.  If you've found a brand that works with a laser printer, please share!  I've never seen one.

Once it's printed, stick it on your mat and load it into your Cameo.  Have your machine scan the registration marks and get your cut settings ready.

Here's a snap of what settings I use.  I set it to "Flocked HTV" and then change the blade to 5.  That's why it says Custom Media.  ***Note- I get a lot of use out of my blades, but when I switched to a new one, I only had to use HTV Smooth settings, blade on 1!  Big difference!****


Have your machine cut.  You're basically doing Print & Cut, easy, right?  I love Print & Cut and it's the biggest reason I bought my Cameo.

Once your design is cut, you then remove it from it's backing paper.  You'll see that this stuff feels more like Siser Easyweed and not regular printable HTV.

Here's me just peeling up the corner and removing all the excess white- the backing paper does not cut, see it?  I did rip it a little when grabbing that corner but it's almost like the carrier sheet of Siser Easyweed (except not used as such- just that you don't cut that paper, just your HTV.  A kiss cut.  Anyway..)


Aaand here's me peeling my design off the backing paper.  This is the one thing I don't like.  Unlike Siser Easyweed which is on a carrier sheet, I have to line up all these elements by hand separately on the t-shirt and yeah, they end up off center sometimes.  I'm working on that.  Practice makes perfect!

See how it weeds itself in between letters and stuff?  It's pretty nifty.

Your next step is to line everything up on your shirt (iron it first, but let it cool before you start re-arranging stuff on it) and when it's to your liking, grab a sheet of parchment paper.  I've always had 1-2 sheets included in whatever pack of dark color printable HTV I buy, and it lasts for several sheets.

Place that over your design- careful, don't jostle anything- and iron.  My iron goes from 1-6 so I set it on 6, no steam, and press really hard for 20 seconds.  Then I pick it up, move it, press again, until I've done the whole design.  The instructions do say not to drag your iron but to pick up and move it.


When I'm done I just lift the parchment paper- unlike the Siser Easyweed carrier sheets, it's not going to be sticky to your shirt or anything- and voila, shirt!

This IS a classic example of me arranging things crooked and/or off center, but on a wiggly 3 year old, it's not very noticeable :) With Siser Easyweed and it's sticky sheets I normally line everything up on the floor and then step back and look at it, and then I can just pick up the shirt and move it to the ironing board, but you can't do that with this stuff- no carrier sheet.  My only pet peeve.

You'll also probably notice that the fishing line is missing some pieces- in removing the design from the backing that part was just too thin and I went too fast, but oh well.  It is what it is.  This is a tiny shirt for a tiny little toddler.


I always wash inside out, and never iron on the design itself, but other than that, I've found this stuff to be very durable!


1.21.2013

Happy 3rd Birthday to Vivi!

My good friend Val has a little girl who was born right around Frankie's original due date.  Vivi is the cutest thing ever and when Val asked me to make her some birthday gear I jumped at the chance to play with pink for a change!

Val had already found a picture that she liked, and using some scalloped circle shapes from the Silhouette Store we put this little design together.  Val tweaked it a bit, most noticeably adding the second circle around the "3," and then asked for matching stickers.  Those were really easy as long as I made sure that the only cut lines set were those of the scalloped circle and nothing inside!

Front of shirt

Val wanted a similar design on the back:

I don't know why it looks so oddly off center.  Bump in the shirt maybe?  I swear it's straight!:p

She also asked for matching stickers.  She is going to put them on party hats- how cute is that???  And some extra for people to wear like a normal sticker.  I even sent her some extra large stickers for decorating.  If I had a girl I would stick them on a vase, fill the vase with candy, and some pink flowers...ok, enough dreaming of pink!

I ran into two issues during stickers, and I fixed them both, which is why I'm sharing.

First issue- sticker paper settings on the Cameo are too rough.  So are vinyl settings.  I did not want the blade to cut through the backing paper.  I wanted a kiss cut, which is where the sticker is cut but the backing is intact, like a sheet of stickers.


I finally fixed this problem using the settings:  Blade: 1, Speed: 6, Thickness: 8.


I was so happy to see that fixed, but I then realized that this sticker paper was split in two places down the back, I'm assuming to make it easier to remove stickers?  Well, these stickers were getting mailed to Disney World, not used right away.

Stickers that I repositioned to be around the splits in the backing paper...


My fix was pretty simple.  After printing but before cutting, I put strips of packing tape down the back.


This worked like a charm.  The paper no longer split apart once I weeded the extra sticker paper from around the stickers, and as a bonus it didn't stick to the Cameo mat quite as badly.  My mat is fairly new and still sticky enough that if I'm not careful, it will rip paper when I try to remove it from the surface.

I hope Vivi has a great birthday!!!  I will update with pictures of the party hats and anything else that got the sticker treatment :)


1.03.2013

3rd Birthday T-shirt

Someone is turning THREE years old over here! Where did the time go???!!!

I wanted to make him a t-shirt to wear to preschool on his birthday. I already had a black t-shirt and bought some Jolee's heat transfer paper for colored fabrics. I then wasted 2 sheets of it as my Cameo would not cut the design properly.

 I switched to some flat (regular) and flocked (thicker and kind of fuzzy). A lot of people don't like the flat HTV that Silhouette makes. I can see why. It cut ragged and it stretched when weeding, meaning again I trashed the cut.

However, the flocked HTV cut great!

 I had some Siser Easyweed left over from a shirt I made for my husband. It wasn't a color that I wanted to use but it was all I had left. I did end up liking the final product.

The green is Siser Easyweed and the yellow is the flocked Silhouette HTV.


I tried to take a photo of the flocked vs flat as well
Uploaded from the Photobucket iPhone App

I have a few other crafts to post, a lot to do, and even a bunch of stuff for What I Wore Wednesday- shocking, I know!

Thanks for reading, as always!