Showing posts with label DIY. Show all posts

5.19.2018

How I made a DIY decorative box to hide my router for $11


I've moved into a new house and have a lot of things planned and decorating to do!  One of the first things I've wanted to get to is the mantle.  Above it is a recessed box with the cable, power, and other outlets.  I guess in newer builds the cable outlets aren't necessarily finished so this is the only place to plug in the modem and therefore the router.  The modem is small and just hidden behind stuff on the other end of the mantle but the router was more of a challenge.

This is what I started with:


The art canvas was sort of hollow due to the frame, so it works great to just hang over the box with all the outlets.  We had a lot of clutter on the mantle to try and hide the wires but hopefully this DIY makes it look more polished for now.  I saw similar hide-away boxes on Amazon and Etsy in the $50+ range, and at least on Amazon, you didn't have total control over the way the finished product looked.

So, first I went to Tuesday Morning and found a whole shelving unit of fake books.  I bought two, which cost me $11.  I had this project in mind for awhile so I had the measurements of the router in my phone and picked a book slightly wider and taller.  Depth wasn't as much of a concern since I'd be cutting the back off and because the antennas will still stick out of the back.  Then I went home and grabbed a hand saw from the garage and cut off the "back" part of the book that would go over the router:


In my case I just had to cut the two corners and then by bending that piece down I was able to just tear it off.  So now once you swing the lid closed again, you've got a box with an open back slot to slip a router inside...


As you can see, the box is still going to be away from the wall a bit due to the antenna.  This also is a plus if you're worried about the router getting hot.  When I tried this with real books it absolutely got hotter, but as this is more of a box around the router and lighter than a normal book it doesn't seem to get hot so far.  If you're really concerned you could also cut out the sides of your fake book for more air flow.  The smaller book is also a fake hollow book to keep things light.  I stuck a cute flower pot I got at Hobby Lobby ages ago on top but the antennas were still bothering me.


Well, luckily the antennas are flexible, so I just aimed them all more towards the center to hide them.  So far I haven't noticed any signal loss, but if I did I'd first re-position the antennas and if I had to I'd remove this box except when company comes over.

I hope this helps someone out!  My favorite part of DIY stuff is being able to recreate something I want, have it be exactly to my tastes (and/or size if that's a concern), and do it cheaper.


10.31.2013

Happy Halloween! DIY Decor

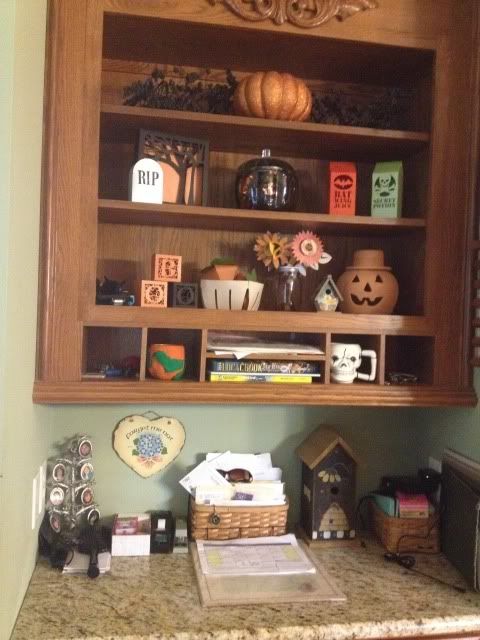
Happy Halloween!  Free time has been scarce around here.  I can't believe my little one is almost two months old already!  I love Halloween so did take the time to set up this little decorated desk area in the kitchen.

Most of this is DIY- one painted pumpkin and 8 files from the Silhouette online store!

Top shelf- garland from Michael's.  Pumpkin from Michael's, glittered by me.

Middle shelf- tombstone and spooky tree frame from Silhouette store.  Glass pumpkin from Walmart and filled with a cheap tinsel Halloween garland.  Bat Wing Juice and Poison cartons from Silhouette store.

Bottom shelf- BOO boxes, fruit basket, 3D pumpkins, and paper flowers from Silhouette store.  Birdhouse is from Tuesday Morning.  Terra Cotta pumpkin is from HomeGoods.

Special mention- the weird looking pumpkin thing with green vines in that little nook shelf was made by me in elementary school!  The skull mug in the nook is from the dollar store.


The 3D pumpkins in the fruit crate are probably my favorite, though the Bat Wing and Poison cartons have inspired me to make a whole apothecary shelf for next year- maybe the mantle?  Eyeballs in mason jars and lots of creepy files from the Silhouette store should make it easy!

4.24.2013

Happy spring & a tire swing

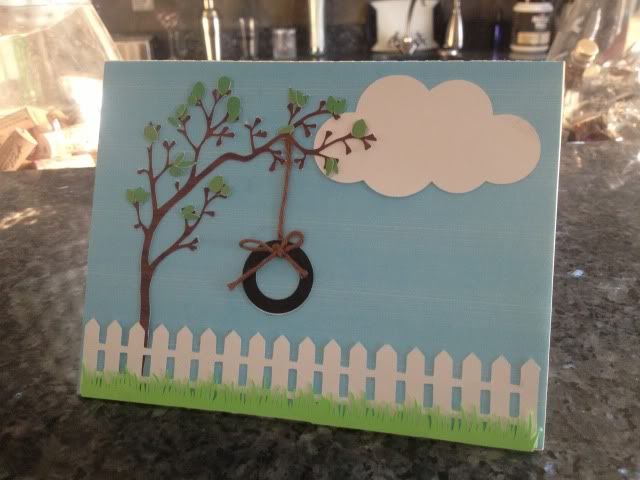
I have barely looked at my Cameo since I found out I was pregnant in January.  I've played with the software, dreamed of what I'm going to make for the holidays in our new house, thought about what I can make for the new baby to wear, etc...very little actual crafting however.  That will probably change for my baby shower next month, but for now, I just made this cute little card.

Every shape is in the Silhouette store and the only colored paper I used was the green grass; the rest is all print & cut, even the background.  I needed a birthday card for someone and liked the idea of a white picket fence, but not a house since it wasn't for a housewarming.  I had the string laying around and even though I cut cardstock "rope" I changed my mind and I like the string much better :)

This is my favorite part of owning a Cameo over a Cricut (which I still have..)- I can browse the online store, buy a single shape that I like, mix & match all of my shapes, resize, color, edit, and make a digital template, then print it, cut it, and put it together, without getting up or going to the store!


Shape links:

The card itself is this card's shape minus all embellishments, and then I just made a square the same size as the front half and print & cut it blue

I placed the leaves one by one by first putting small glue dots all over where I wanted the leaves, and then using the Pick Me Up tool, placed them one by one easily & quickly over the glue dots.

The birthday girl liked it so much that she wants me to make her 24 random cards, blank inside, and pay me of course :) Guess I'll be busy on the Cameo after all!

2.09.2013

Eggless Chocolate Chip Cookie Dough FroYo

Ice cream for breakfast!  Being pregnant I'm having a hard time with food right now.  I'm also diabetic so I can't give in to a lot of my cravings.  This one is OK for me- I'm not calling it a diabetic recipe though, check your own blood sugar for your body's verdict on that- and obviously healthier than just eating a bowl of cookie dough.


What you need:

1/4 cup sugar
1/2 cup packed brown sugar
1/2 cup butter, softened for easier mixing
1/4 tsp salt
2 tsp vanilla extract
1 cup flour
1/4 tsp baking soda
1 cup mini chocolate chips
1 cup vanilla yogurt

Beat sugars and butter together until mixed and creamy.  Add vanilla and mix again.  In a separate bowl stir together flour, baking soda, and salt.  Once mixed, stir in chocolate chips.  Mix the two bowls together by hand.  Stir in yogurt until fully combined.  Freeze overnight.

My quality control specialist.  Once he realized those were chocolate chips, he disappeared to eat a bowlful.

Before freezing, it really does look like cookie dough!


And after freezing, ice cream it is!


1.05.2013

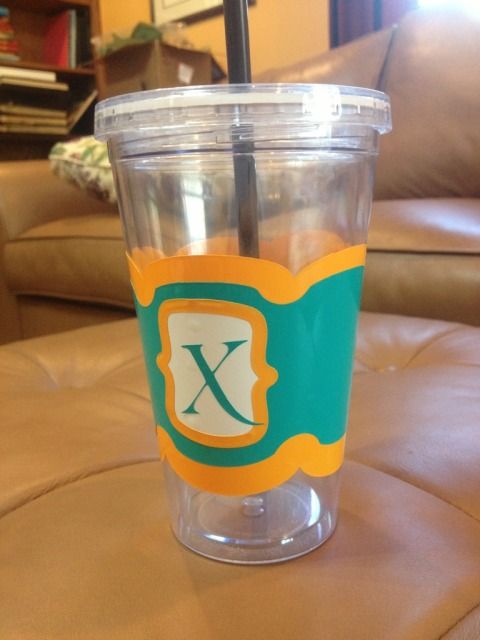
Vinyl Tumbler Decoration

Yesterday my Cameo went crazy.

It started randomly cutting dots and dashes and despite all my best troubleshooting efforts, it won't stop unless I disconnect it from the computer.  This makes crafting difficult but not impossible.

The Cameo has a "Cut from SD card" feature and I learned how to use it (though I hope I won't have to very often- it's a longer process).

First, you have to save every part of your design to the card separately unless you want more than one piece in the same color/material (in my case, anything orange was one file, turquoise another, & white was a third file).  Just put what you want on your virtual mat and hit "Save to SD card."  Name it something obvious so you can find it.

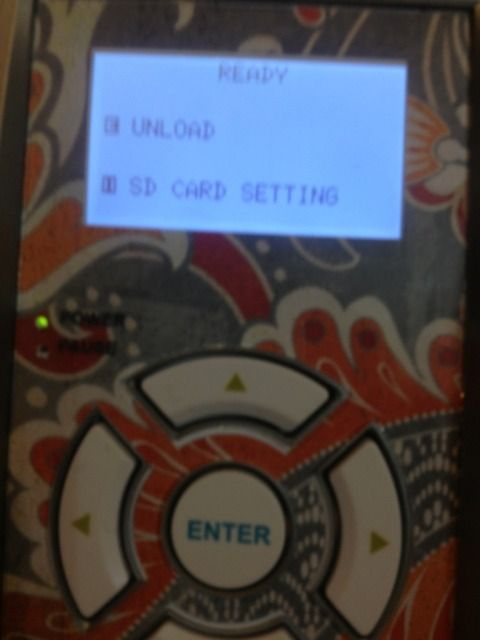
Now, go ahead and put your first material on your mat and load it.  Then pop in the SD card.  You'll see that you have to hit "Pause" for the SD card settings.


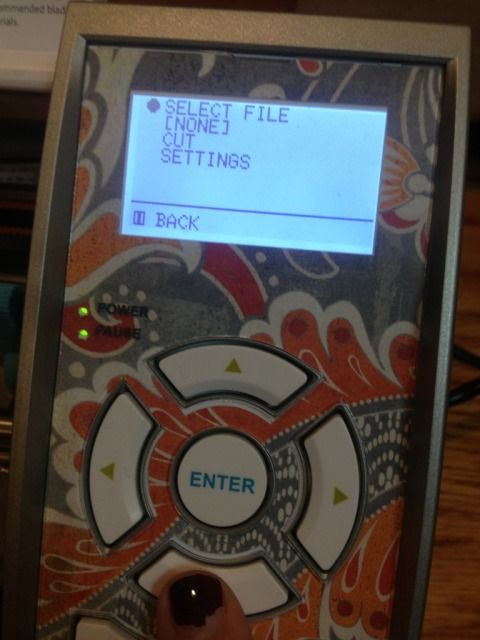
 Go to "Select File" and hit enter (eek, ignore my nail polish!!!)


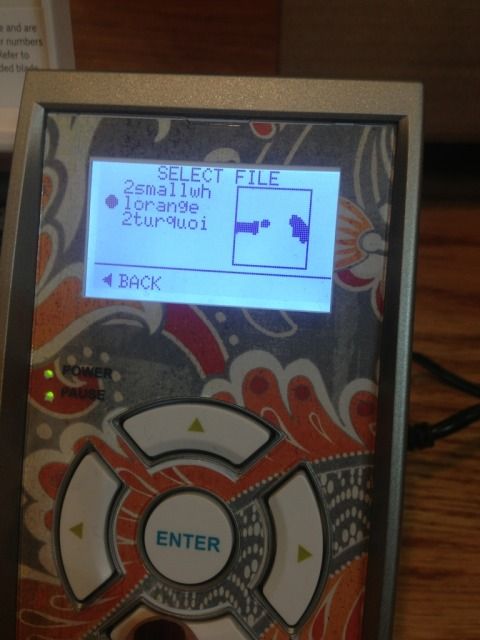
Scroll down until you see what you want to cut and hit "Enter" again.  The photo is NOT the image...at all.  This particular file was the small orange border piece in the middle of the turquoise part.


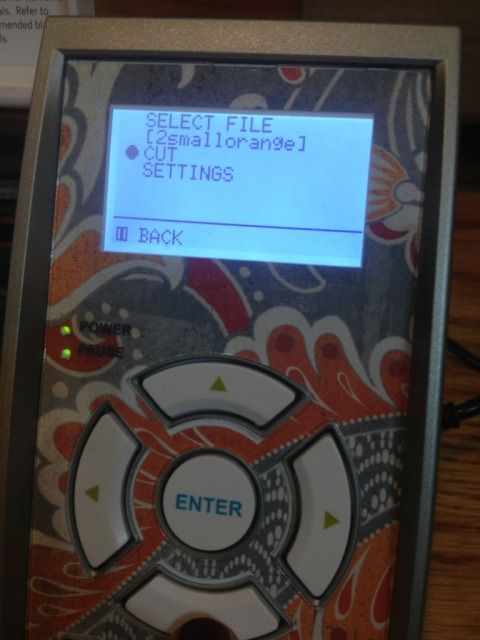
Now you'll see your file name where it previously said NONE.  Scroll down to Cut and hit "Enter."


And it will cut!  Then you will just find your other files one by one as you reload your mat.

Tedious, but it works in a pinch.

I'll be changing the X.  The flourish looked better on screen.

This file is actually a coffee cup wrap and can be found in the Silhouette online store


1.03.2013

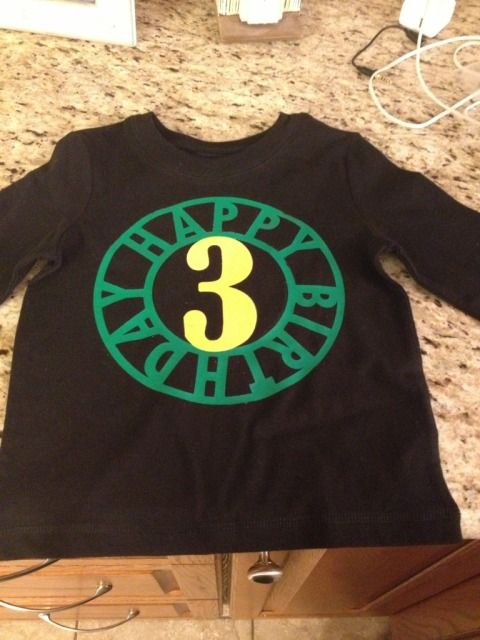
3rd Birthday T-shirt

Someone is turning THREE years old over here! Where did the time go???!!!

I wanted to make him a t-shirt to wear to preschool on his birthday. I already had a black t-shirt and bought some Jolee's heat transfer paper for colored fabrics. I then wasted 2 sheets of it as my Cameo would not cut the design properly.

 I switched to some flat (regular) and flocked (thicker and kind of fuzzy). A lot of people don't like the flat HTV that Silhouette makes. I can see why. It cut ragged and it stretched when weeding, meaning again I trashed the cut.

However, the flocked HTV cut great!

 I had some Siser Easyweed left over from a shirt I made for my husband. It wasn't a color that I wanted to use but it was all I had left. I did end up liking the final product.

The green is Siser Easyweed and the yellow is the flocked Silhouette HTV.


I tried to take a photo of the flocked vs flat as well
Uploaded from the Photobucket iPhone App

I have a few other crafts to post, a lot to do, and even a bunch of stuff for What I Wore Wednesday- shocking, I know!

Thanks for reading, as always!

12.17.2012

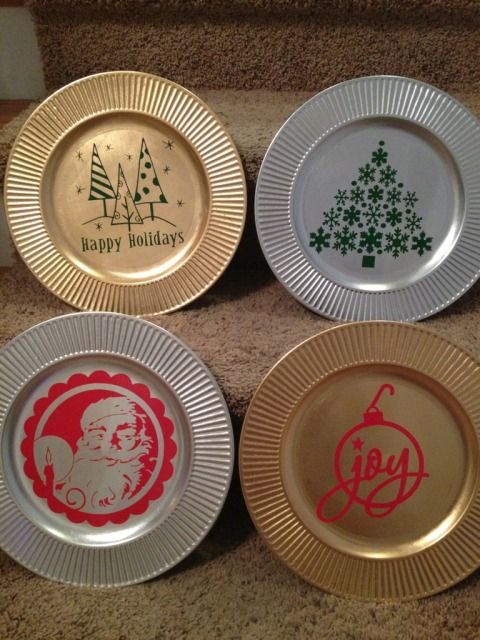
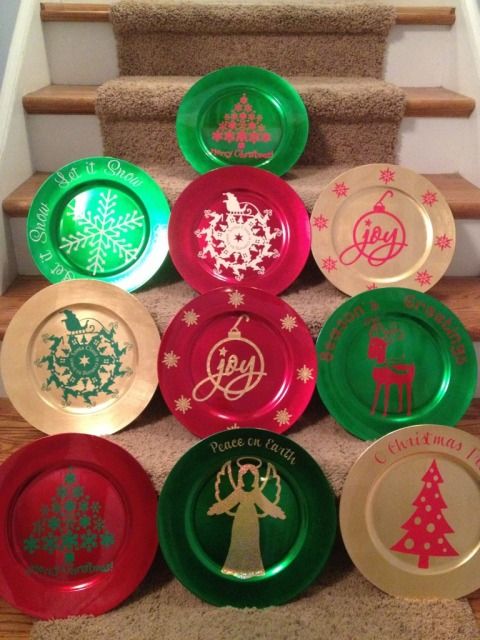
Vinyl on $1 Chargers

The title really says it all.  A sheet of vinyl, 12 x 24", is about $1.96 and many online vinyl stores have coupons out there.  The chargers were $1 at Dollar Tree.  While some people have had no problems putting vinyl in the dishwasher, you may not be as lucky, so be careful.  These chargers are great for place setting or giving gifts like Christmas cookies.


Cute huh?  Some detail:


Isn't that deer just adorable?  These really jazz up a typical paper plate of cookies, or even better, it's a dish you don't have to worry about getting back!


12.05.2012

Cardstock Christmas Village

First off I apologize for the silence lately.  In 2008 I received my Bachelors degree, got married a week later, and haven't really worked since.  I decided to go back to school for a different degree and started earlier this week.  I love school but I forgot how much homework is involved!  In fact, I have 2 more case briefs to read for this week, so I have to make this quick.


This took me 3 days since that pesky school work kept getting in the way.  I bet it would have taken me even longer had I not be introduced to the wonder that is glue dots.  I wish I had tried them sooner!


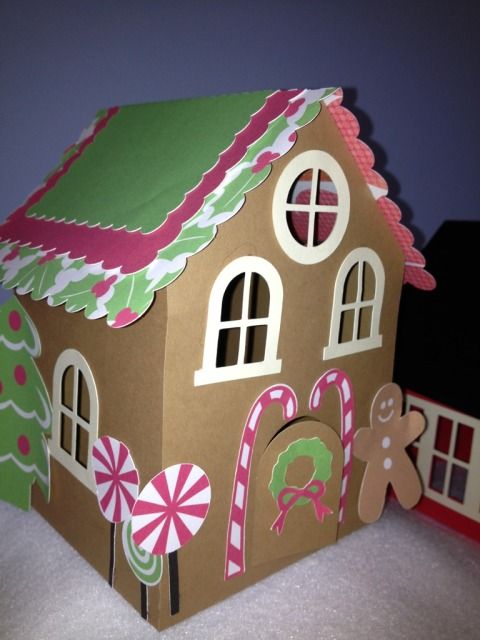
I believe these three are all different designers.  The pinkish house is a simple print and cut, as is the small gingerbread house (although the cut/fold lines of that house are a little off...).  The large gingerbread house was cut from card stock but the details were done with print & cut.


If you didn't print the holiday details and printed the roof out of something (anything) else this could easily work as just a simple little house, not a gingerbread house!


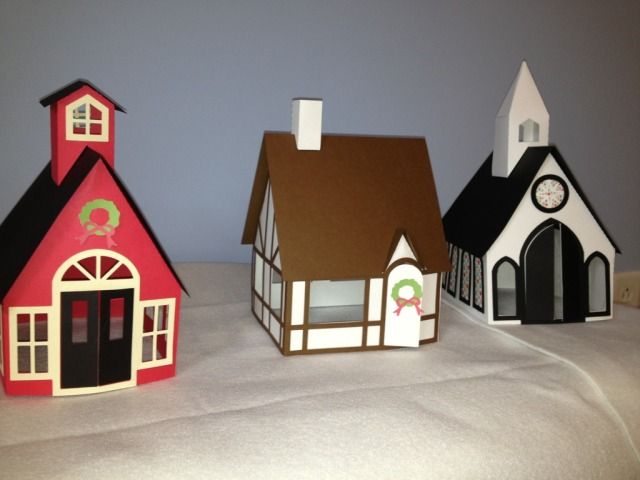
These three are all from the same designer and I wish they would release more!  I added the wreaths for a holiday touch.  The window frames, brown detailing on the cottage, etc, are all card stock are the walls & roofs.  

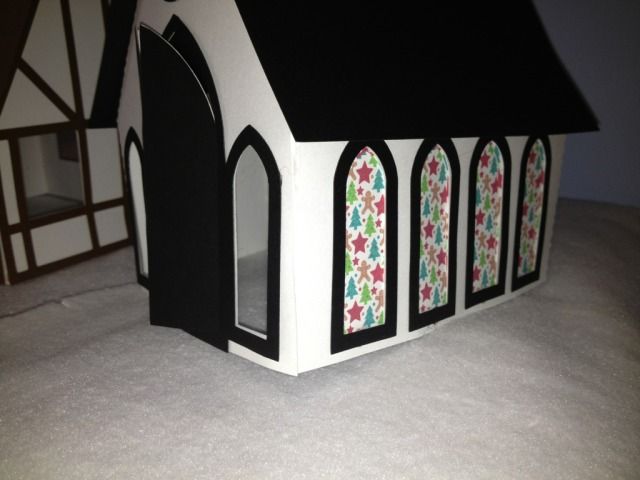
The church's white & black parts are card stock and then I used a holiday pattern and print & cut to give the illusion that it was a holiday stained glass within the window frames.


Normally 3D projects drive me nuts, but I really think the glue dots made a BIG difference.  Huge.  I'll never go back.  I can't wait for more 3D houses to be released in the Silhouette Store!

11.14.2012

DIY Harvest Banner with the Silhouette Cameo (Pic heavy!!!)

I have seen lots of fall decor around lately.  I've even seen files to buy all or parts of a banner both in the Silhouette Online Store & for sale around the net by various file makers.

The thing is, I like being creative.  I wish I could freehand draw in Silhouette Studio; that would make it perfect.  I *almost* bought a set of files on the Sil Store for a banner, but each letter in "Harvest" was a different 99c download, and I couldn't find the file for the H!  So, DIY it was!  I managed to make this ALL with shapes I already owned.

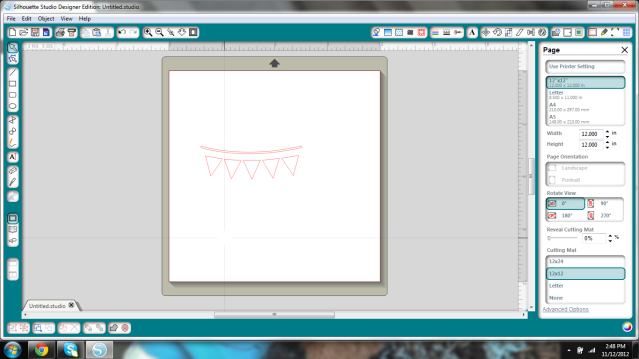
I started with this shape.  I used it to make a tiny print & cut banner that I made to go with a scarecrow in a plant.


I deleted the rope shape and all of the triangles except for the middle one.

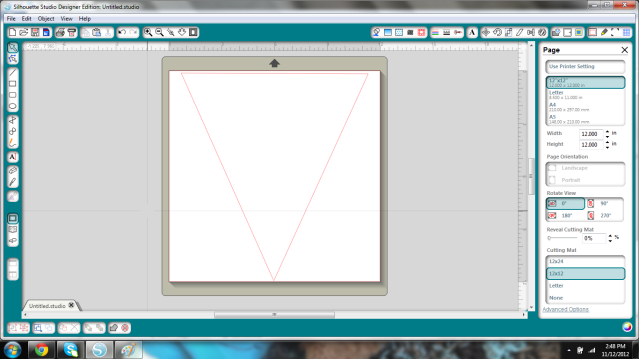
I wanted it to be a large banner so I stretched this as large as would fit on the 12x12" mat.


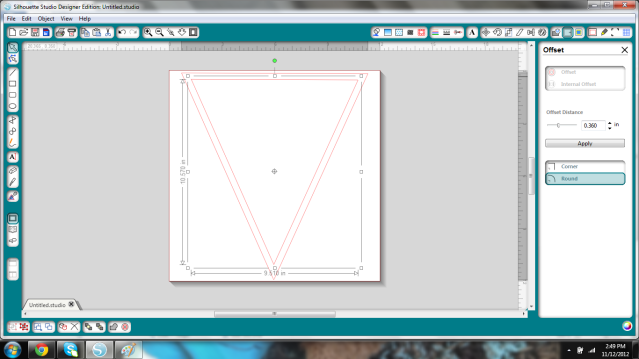
I then created an Internal Offset and increased the offset distance until I liked how it looked.


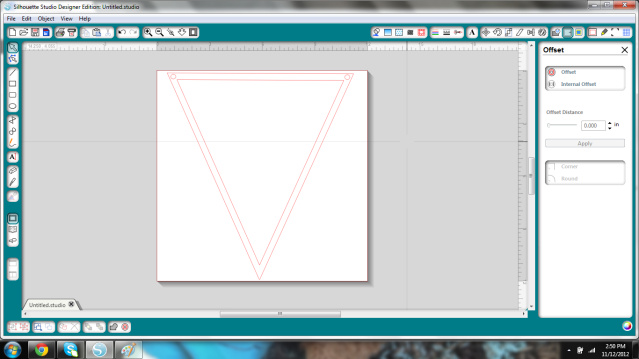
Next I added two small circles (I made one and duplicated it so they'd be the same, actually) to string my banner up.  Twine in mind at this point.


Now- remove your inner pieces, and group the holes & outer triangle.  Save it, as you'll need to cut it for each letter.  I'll need 7 for Harvest.  Set it aside; you don't need it any more.

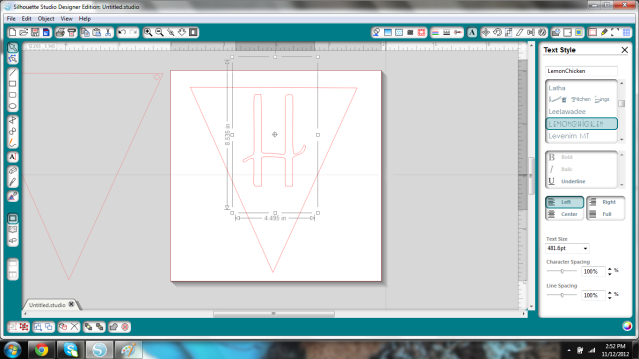
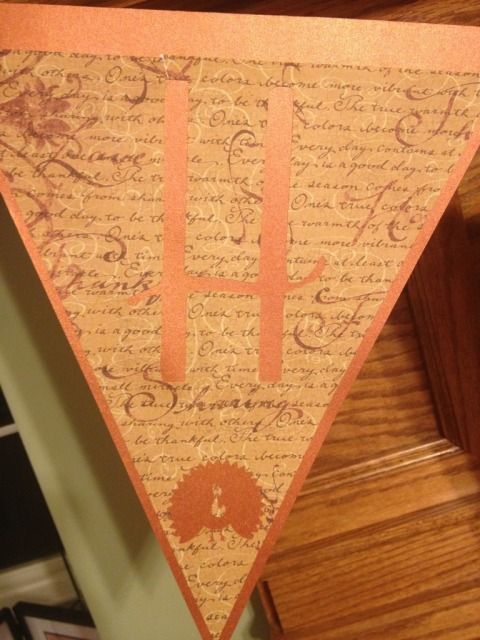
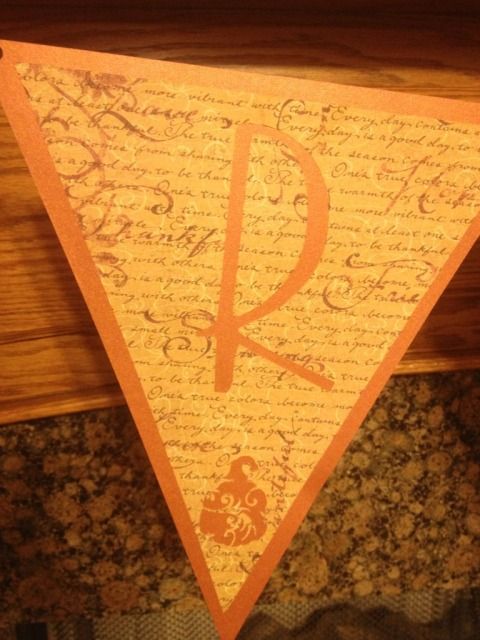
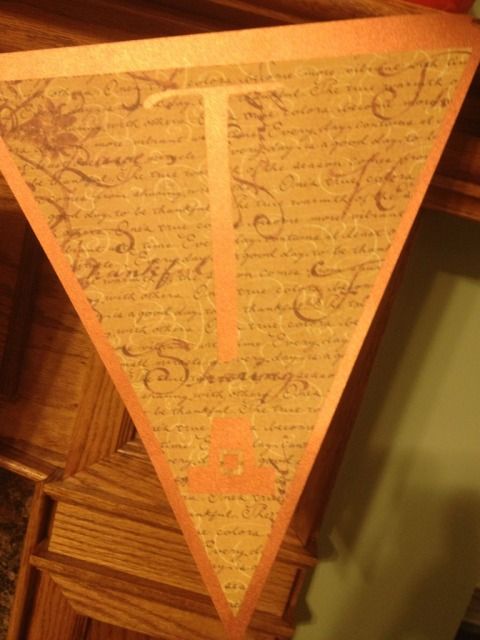
Take your inner (the Internal offset) piece, type your first letter, find your font, resize, and stick an image you like on the bottom (if you want).  I had a group of leaves, a pumpkin card, a gourd-type sketch, a turkey, and I took the hat from the Scarecrow shape which I stretched taller and added 2 squares for a buckle- instant pilgrim hat!


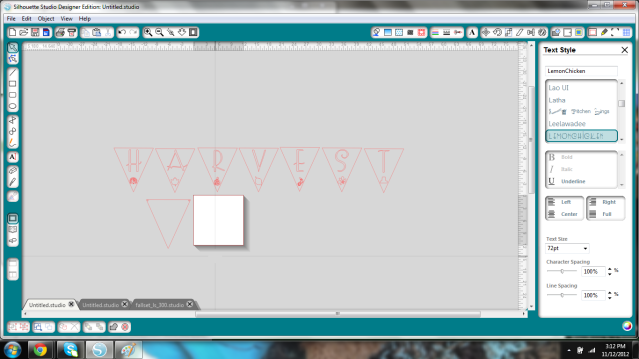
I just kept duplicating the Internal Offset triangle and resizing shapes that I thought would look good, and when done, I lined them all up and zoomed out so I could get a look at it.  I didn't duplicate the outer triangle 6x because I just used my imagination.


It's kind of hard to see from that pic but I was just getting a general idea of how it would look in case I needed to tweak it.

I then went to Michael's, since I have a library of vinyl but no cardstock, and just kind of visualized it with the current fall decor on the mantle.  This orange background flag is GORGEOUS.  I wish I could photograph it or describe it accurately.  It's a deep orange, but iridescent, almost like a good expensive fabric that shimmers and takes on a life of it's own when you move.  Anyway, total for 14 sheets of paper was $8.86.

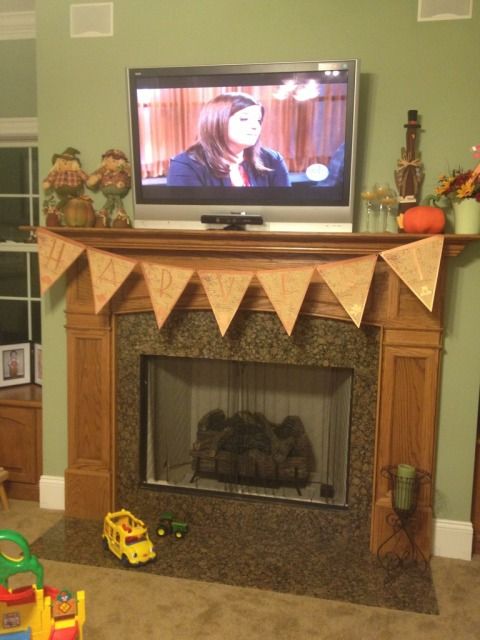
Cut, glue, string, & reveal!

My house has toys on the floor.  I have a toddler.  Also, I love the food network. 

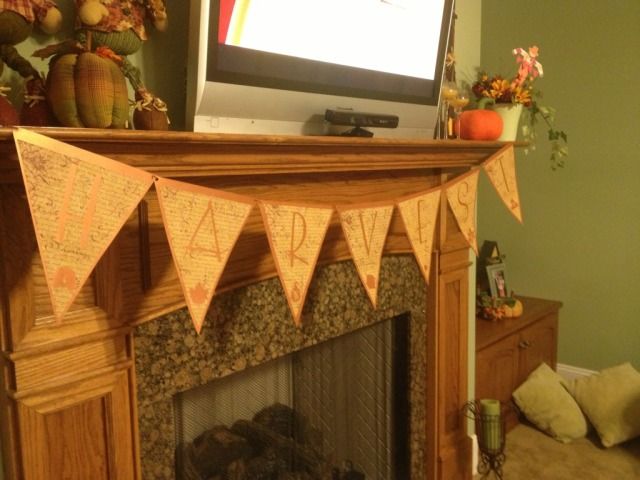
I used brown string that I got at Michael's in a 3-pack of brown shades for about $2.  I strung it so that the string was behind the triangles from hole to hole rather than in front.  Oh, and the length?  I taped it to one end of the mantle, strung the flags on, and hoped like heck that the flags weren't going to be too long.  I then pulled it up, taped the other end, and slid the letters back and forth until I liked the spacing.

I have to say, I really like how it came out!


I used 3M Spray Adhesive.  I actually really dislike working with glue.  I find spray adhesive the easiest to use, although I have to keep washing my hands, but it does give it a nice and fast even coat.  It's not completely tacky for the first minute or so, making it re-position-able (at first).  Little pieces, like the turkey face, hat buckle, or inner letter pieces I used a glue stick.


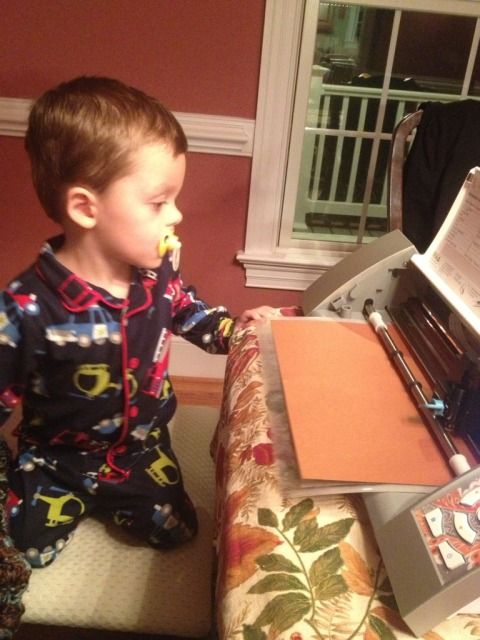
I had a "handy helper" (Oh, Mickey Mouse Clubhouse, how you've implanted into our brains after nearly 3 years) for most of this too!


9.23.2012

Good things are coming...

I love my Cricut X, but guess what bandwagon I finally jumped on...


It will be here this week!  A big thanks to my hubby, who buys me gifts he knows I'm coveting, even when there's no occasion!

Meanwhile, I've already downloaded Silhouette Design Studio and have about a half dozen projects just waiting for the Cameo to get here.  Halloween decor, bedroom accents, labels, cards, fall decor...and even better, I officially have a craft room now too!

Happy weekend!

8.28.2012

Inexpensive DIY Carpet to Wood Stairs

Guess what?  We're moving!  The military is PCSing us once again and first the first time, we are homeowners.  We have some time, and I spent some of that time cleaning the carpets to get the house ready for real estate photos.

One thing I gave up on cleaning was this staircase.  It faces the door to the garage, so any time anyone comes in from the garage, their dirty shoes get all over this carpeted staircase.  I don't know what we were thinking putting carpet here!


Home prices just aren't what they used to be, so while I want my house to look as good as possible, I also don't want to put a lot of money into it.  I pulled off a DIY renovation all by myself for $39!

Supplies:
Dark, glossy paint:  $12
Macademia paint:  $12
Pry Bar:  $7
Make it Last!:  $4
Paint Brush:  $5
Caulk and caulk gun: on hand, but around $3 for caulk and $6 for gun at Lowe's
Pliers: On hand, but around $4 at Lowe's
Sander: On hand, but around $40 at Lowe's
Hammer:  On hand, but around $6 at Lowe's
{Yes, I realize there are 5 items you need to have on hand to stay at $39.  Or, maybe you have them plus a paintbrush and a pry bar and your total will be even less!}

{TERMS}
Step:  The flat part of the stair.  The part you step on.  The part that is dark and shiny in the final photo.
Riser:  The back of the stairs.  The vertical part in between each step.  The part painted tan in the final photo.

My two year old was "helping" :) <3

First things first.  Pry up that nasty carpet and see what we're dealing with.  Just grip the corner with the pliers and pull.   You should be able to pull it with your hands after the initial pull.

So what do we have?  Well, gaps in the wall, for one thing.  We have the carpet pad (green) and the tack bars (the wooden strips with red striping and nails sticking up).  You'll also notice that despite being covered, my stairs were textured and painted like my walls.  Score!


Prying up the carpet pad and staples is easy.  Just rip up the pad and then remove the staples with your pliers.


For the tack bar, use your pry bar to dig under the strip of wood and lever it off.  It should have nails evenly spaced- mine had about 4 per staircase width- you can remove those with a hammer after the strip is up.


I don't have photos for these next to steps.

First, take your caulk and fill in any gaps.  ABOUT CAULK:  Do NOT use silicone caulk.  You can't paint over it.

Once your caulk is dry, sand the whole staircase.  It's a pain but you don't have to do much.

Ok, back to the (blurry) photos.

Tape off the wall, the risers, basically everything around the step that you might accidentally get paint on.  This is the part I painted a dark, glossy color.  If this is your only way out of the house, do every other step and wait for them to dry before doing the opposite steps.


Once that's dry, tape off the steps above and below the risers.  I did not tape the walls since I was using the same color as my walls.  Paint your risers and let dry.

Once everything is dry, spray with Make it Last! in a fine but even mist.  That dries very quickly.


Lastly, enjoy your brand new, vacuum-free staircase!

8.14.2012

DIY Bow Back T-shirt Refashion


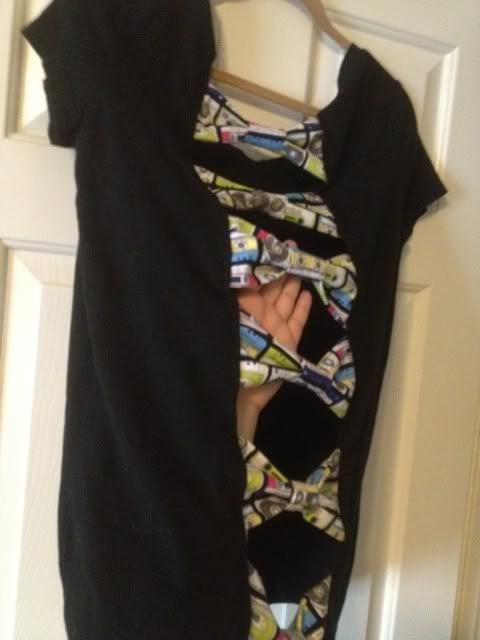
This is a pretty simple refashion, just takes some time.

First take your t-shirt, cut it up the back, fold it over, and sew the seam.

Next, you need to make bows.  Cut 6 rectangles (or however many you personally want) that are 7" x 8.5". The 7" is vertical, 8.5" is the horizontal side.  With right sides together, sew them into a tube, leaving one side open.  Turn them right side out and pin and sew down the side you left open.

For the bow's center, cut strips that are 3" long x 2" wide.  With wrong side up, pin over and sew down the tiniest hem you can possibly sew without eating your material.  Now, put wrong sides together again so your two vertical ends are touching, sew them together, and flip right side out so that you have a tube.

Fold your bow like it's an accordion and slip the center piece onto it.  Adjust & ruffle your bow as needed.

Pin the bows to the back of the shirt- end of the bow to the INSIDE- and sew down.

Remove pins and show off!

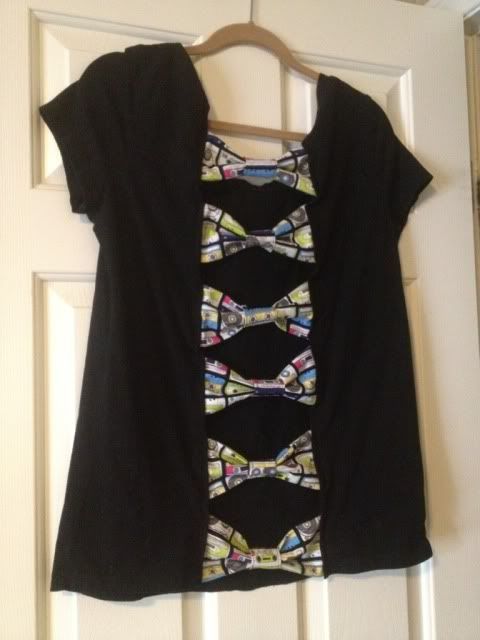
So this is the back:


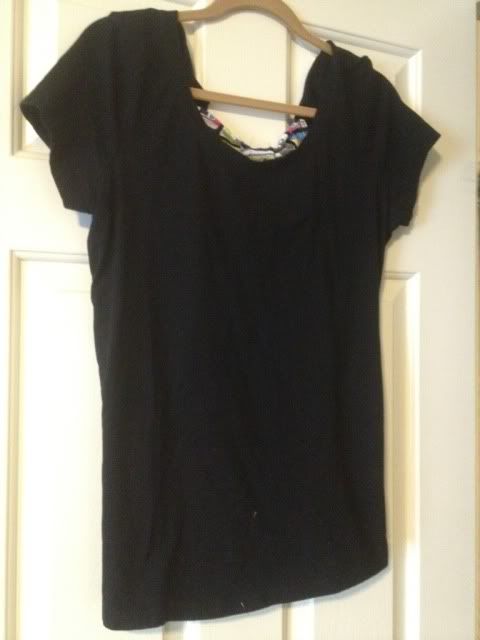
And front- you won't see anything but black til I turn around!  That bow is just peeking out because the scoop neck is low in the front.


Showing posts with label DIY. Show all posts

5.19.2018

How I made a DIY decorative box to hide my router for $11


I've moved into a new house and have a lot of things planned and decorating to do!  One of the first things I've wanted to get to is the mantle.  Above it is a recessed box with the cable, power, and other outlets.  I guess in newer builds the cable outlets aren't necessarily finished so this is the only place to plug in the modem and therefore the router.  The modem is small and just hidden behind stuff on the other end of the mantle but the router was more of a challenge.

This is what I started with:


The art canvas was sort of hollow due to the frame, so it works great to just hang over the box with all the outlets.  We had a lot of clutter on the mantle to try and hide the wires but hopefully this DIY makes it look more polished for now.  I saw similar hide-away boxes on Amazon and Etsy in the $50+ range, and at least on Amazon, you didn't have total control over the way the finished product looked.

So, first I went to Tuesday Morning and found a whole shelving unit of fake books.  I bought two, which cost me $11.  I had this project in mind for awhile so I had the measurements of the router in my phone and picked a book slightly wider and taller.  Depth wasn't as much of a concern since I'd be cutting the back off and because the antennas will still stick out of the back.  Then I went home and grabbed a hand saw from the garage and cut off the "back" part of the book that would go over the router:


In my case I just had to cut the two corners and then by bending that piece down I was able to just tear it off.  So now once you swing the lid closed again, you've got a box with an open back slot to slip a router inside...


As you can see, the box is still going to be away from the wall a bit due to the antenna.  This also is a plus if you're worried about the router getting hot.  When I tried this with real books it absolutely got hotter, but as this is more of a box around the router and lighter than a normal book it doesn't seem to get hot so far.  If you're really concerned you could also cut out the sides of your fake book for more air flow.  The smaller book is also a fake hollow book to keep things light.  I stuck a cute flower pot I got at Hobby Lobby ages ago on top but the antennas were still bothering me.


Well, luckily the antennas are flexible, so I just aimed them all more towards the center to hide them.  So far I haven't noticed any signal loss, but if I did I'd first re-position the antennas and if I had to I'd remove this box except when company comes over.

I hope this helps someone out!  My favorite part of DIY stuff is being able to recreate something I want, have it be exactly to my tastes (and/or size if that's a concern), and do it cheaper.

10.31.2013

Happy Halloween! DIY Decor

Happy Halloween!  Free time has been scarce around here.  I can't believe my little one is almost two months old already!  I love Halloween so did take the time to set up this little decorated desk area in the kitchen.

Most of this is DIY- one painted pumpkin and 8 files from the Silhouette online store!

Top shelf- garland from Michael's.  Pumpkin from Michael's, glittered by me.

Middle shelf- tombstone and spooky tree frame from Silhouette store.  Glass pumpkin from Walmart and filled with a cheap tinsel Halloween garland.  Bat Wing Juice and Poison cartons from Silhouette store.

Bottom shelf- BOO boxes, fruit basket, 3D pumpkins, and paper flowers from Silhouette store.  Birdhouse is from Tuesday Morning.  Terra Cotta pumpkin is from HomeGoods.

Special mention- the weird looking pumpkin thing with green vines in that little nook shelf was made by me in elementary school!  The skull mug in the nook is from the dollar store.


The 3D pumpkins in the fruit crate are probably my favorite, though the Bat Wing and Poison cartons have inspired me to make a whole apothecary shelf for next year- maybe the mantle?  Eyeballs in mason jars and lots of creepy files from the Silhouette store should make it easy!

4.24.2013

Happy spring & a tire swing

I have barely looked at my Cameo since I found out I was pregnant in January.  I've played with the software, dreamed of what I'm going to make for the holidays in our new house, thought about what I can make for the new baby to wear, etc...very little actual crafting however.  That will probably change for my baby shower next month, but for now, I just made this cute little card.

Every shape is in the Silhouette store and the only colored paper I used was the green grass; the rest is all print & cut, even the background.  I needed a birthday card for someone and liked the idea of a white picket fence, but not a house since it wasn't for a housewarming.  I had the string laying around and even though I cut cardstock "rope" I changed my mind and I like the string much better :)

This is my favorite part of owning a Cameo over a Cricut (which I still have..)- I can browse the online store, buy a single shape that I like, mix & match all of my shapes, resize, color, edit, and make a digital template, then print it, cut it, and put it together, without getting up or going to the store!


Shape links:

The card itself is this card's shape minus all embellishments, and then I just made a square the same size as the front half and print & cut it blue

I placed the leaves one by one by first putting small glue dots all over where I wanted the leaves, and then using the Pick Me Up tool, placed them one by one easily & quickly over the glue dots.

The birthday girl liked it so much that she wants me to make her 24 random cards, blank inside, and pay me of course :) Guess I'll be busy on the Cameo after all!

2.09.2013

Eggless Chocolate Chip Cookie Dough FroYo

Ice cream for breakfast!  Being pregnant I'm having a hard time with food right now.  I'm also diabetic so I can't give in to a lot of my cravings.  This one is OK for me- I'm not calling it a diabetic recipe though, check your own blood sugar for your body's verdict on that- and obviously healthier than just eating a bowl of cookie dough.


What you need:

1/4 cup sugar
1/2 cup packed brown sugar
1/2 cup butter, softened for easier mixing
1/4 tsp salt
2 tsp vanilla extract
1 cup flour
1/4 tsp baking soda
1 cup mini chocolate chips
1 cup vanilla yogurt

Beat sugars and butter together until mixed and creamy.  Add vanilla and mix again.  In a separate bowl stir together flour, baking soda, and salt.  Once mixed, stir in chocolate chips.  Mix the two bowls together by hand.  Stir in yogurt until fully combined.  Freeze overnight.

My quality control specialist.  Once he realized those were chocolate chips, he disappeared to eat a bowlful.

Before freezing, it really does look like cookie dough!


And after freezing, ice cream it is!


1.05.2013

Vinyl Tumbler Decoration

Yesterday my Cameo went crazy.

It started randomly cutting dots and dashes and despite all my best troubleshooting efforts, it won't stop unless I disconnect it from the computer.  This makes crafting difficult but not impossible.

The Cameo has a "Cut from SD card" feature and I learned how to use it (though I hope I won't have to very often- it's a longer process).

First, you have to save every part of your design to the card separately unless you want more than one piece in the same color/material (in my case, anything orange was one file, turquoise another, & white was a third file).  Just put what you want on your virtual mat and hit "Save to SD card."  Name it something obvious so you can find it.

Now, go ahead and put your first material on your mat and load it.  Then pop in the SD card.  You'll see that you have to hit "Pause" for the SD card settings.


 Go to "Select File" and hit enter (eek, ignore my nail polish!!!)


Scroll down until you see what you want to cut and hit "Enter" again.  The photo is NOT the image...at all.  This particular file was the small orange border piece in the middle of the turquoise part.


Now you'll see your file name where it previously said NONE.  Scroll down to Cut and hit "Enter."


And it will cut!  Then you will just find your other files one by one as you reload your mat.

Tedious, but it works in a pinch.

I'll be changing the X.  The flourish looked better on screen.

This file is actually a coffee cup wrap and can be found in the Silhouette online store


1.03.2013

3rd Birthday T-shirt

Someone is turning THREE years old over here! Where did the time go???!!!

I wanted to make him a t-shirt to wear to preschool on his birthday. I already had a black t-shirt and bought some Jolee's heat transfer paper for colored fabrics. I then wasted 2 sheets of it as my Cameo would not cut the design properly.

 I switched to some flat (regular) and flocked (thicker and kind of fuzzy). A lot of people don't like the flat HTV that Silhouette makes. I can see why. It cut ragged and it stretched when weeding, meaning again I trashed the cut.

However, the flocked HTV cut great!

 I had some Siser Easyweed left over from a shirt I made for my husband. It wasn't a color that I wanted to use but it was all I had left. I did end up liking the final product.

The green is Siser Easyweed and the yellow is the flocked Silhouette HTV.


I tried to take a photo of the flocked vs flat as well
Uploaded from the Photobucket iPhone App

I have a few other crafts to post, a lot to do, and even a bunch of stuff for What I Wore Wednesday- shocking, I know!

Thanks for reading, as always!

12.17.2012

Vinyl on $1 Chargers

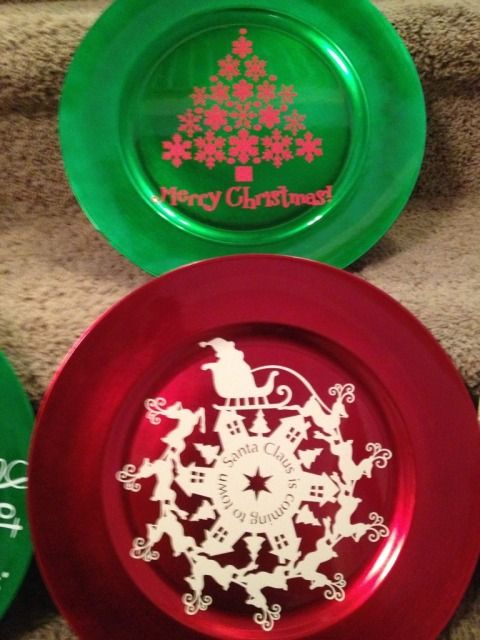
The title really says it all.  A sheet of vinyl, 12 x 24", is about $1.96 and many online vinyl stores have coupons out there.  The chargers were $1 at Dollar Tree.  While some people have had no problems putting vinyl in the dishwasher, you may not be as lucky, so be careful.  These chargers are great for place setting or giving gifts like Christmas cookies.


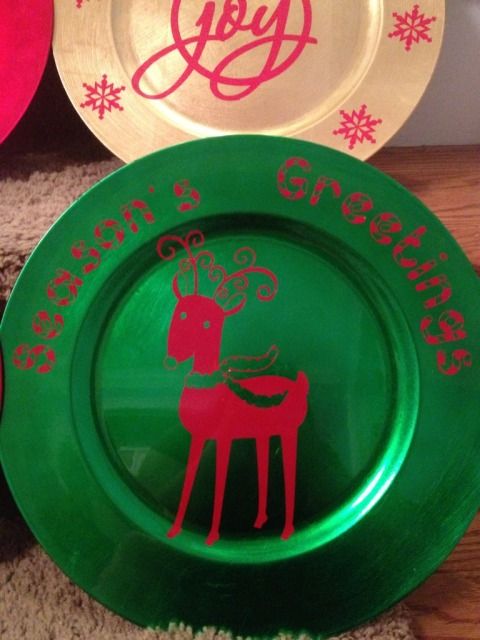
Cute huh?  Some detail:


Isn't that deer just adorable?  These really jazz up a typical paper plate of cookies, or even better, it's a dish you don't have to worry about getting back!


12.05.2012

Cardstock Christmas Village

First off I apologize for the silence lately.  In 2008 I received my Bachelors degree, got married a week later, and haven't really worked since.  I decided to go back to school for a different degree and started earlier this week.  I love school but I forgot how much homework is involved!  In fact, I have 2 more case briefs to read for this week, so I have to make this quick.


This took me 3 days since that pesky school work kept getting in the way.  I bet it would have taken me even longer had I not be introduced to the wonder that is glue dots.  I wish I had tried them sooner!


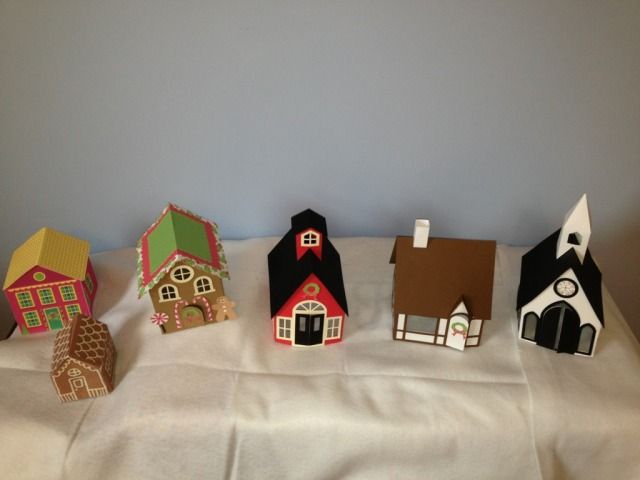
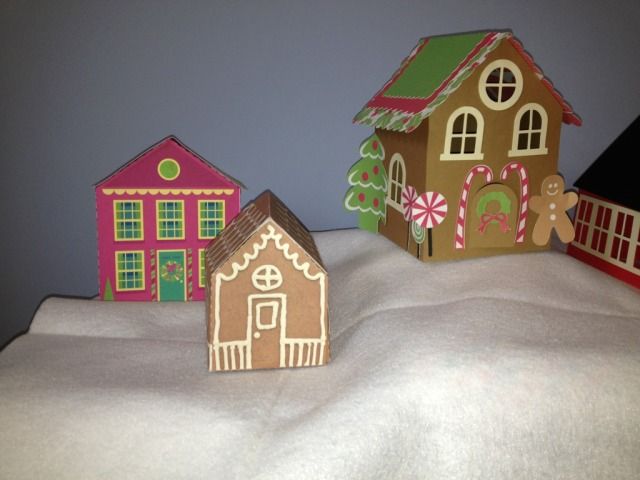
I believe these three are all different designers.  The pinkish house is a simple print and cut, as is the small gingerbread house (although the cut/fold lines of that house are a little off...).  The large gingerbread house was cut from card stock but the details were done with print & cut.


If you didn't print the holiday details and printed the roof out of something (anything) else this could easily work as just a simple little house, not a gingerbread house!


These three are all from the same designer and I wish they would release more!  I added the wreaths for a holiday touch.  The window frames, brown detailing on the cottage, etc, are all card stock are the walls & roofs.  

The church's white & black parts are card stock and then I used a holiday pattern and print & cut to give the illusion that it was a holiday stained glass within the window frames.


Normally 3D projects drive me nuts, but I really think the glue dots made a BIG difference.  Huge.  I'll never go back.  I can't wait for more 3D houses to be released in the Silhouette Store!

11.14.2012

DIY Harvest Banner with the Silhouette Cameo (Pic heavy!!!)

I have seen lots of fall decor around lately.  I've even seen files to buy all or parts of a banner both in the Silhouette Online Store & for sale around the net by various file makers.

The thing is, I like being creative.  I wish I could freehand draw in Silhouette Studio; that would make it perfect.  I *almost* bought a set of files on the Sil Store for a banner, but each letter in "Harvest" was a different 99c download, and I couldn't find the file for the H!  So, DIY it was!  I managed to make this ALL with shapes I already owned.

I started with this shape.  I used it to make a tiny print & cut banner that I made to go with a scarecrow in a plant.


I deleted the rope shape and all of the triangles except for the middle one.

I wanted it to be a large banner so I stretched this as large as would fit on the 12x12" mat.


I then created an Internal Offset and increased the offset distance until I liked how it looked.


Next I added two small circles (I made one and duplicated it so they'd be the same, actually) to string my banner up.  Twine in mind at this point.


Now- remove your inner pieces, and group the holes & outer triangle.  Save it, as you'll need to cut it for each letter.  I'll need 7 for Harvest.  Set it aside; you don't need it any more.

Take your inner (the Internal offset) piece, type your first letter, find your font, resize, and stick an image you like on the bottom (if you want).  I had a group of leaves, a pumpkin card, a gourd-type sketch, a turkey, and I took the hat from the Scarecrow shape which I stretched taller and added 2 squares for a buckle- instant pilgrim hat!


I just kept duplicating the Internal Offset triangle and resizing shapes that I thought would look good, and when done, I lined them all up and zoomed out so I could get a look at it.  I didn't duplicate the outer triangle 6x because I just used my imagination.


It's kind of hard to see from that pic but I was just getting a general idea of how it would look in case I needed to tweak it.

I then went to Michael's, since I have a library of vinyl but no cardstock, and just kind of visualized it with the current fall decor on the mantle.  This orange background flag is GORGEOUS.  I wish I could photograph it or describe it accurately.  It's a deep orange, but iridescent, almost like a good expensive fabric that shimmers and takes on a life of it's own when you move.  Anyway, total for 14 sheets of paper was $8.86.

Cut, glue, string, & reveal!

My house has toys on the floor.  I have a toddler.  Also, I love the food network. 

I used brown string that I got at Michael's in a 3-pack of brown shades for about $2.  I strung it so that the string was behind the triangles from hole to hole rather than in front.  Oh, and the length?  I taped it to one end of the mantle, strung the flags on, and hoped like heck that the flags weren't going to be too long.  I then pulled it up, taped the other end, and slid the letters back and forth until I liked the spacing.

I have to say, I really like how it came out!


I used 3M Spray Adhesive.  I actually really dislike working with glue.  I find spray adhesive the easiest to use, although I have to keep washing my hands, but it does give it a nice and fast even coat.  It's not completely tacky for the first minute or so, making it re-position-able (at first).  Little pieces, like the turkey face, hat buckle, or inner letter pieces I used a glue stick.


I had a "handy helper" (Oh, Mickey Mouse Clubhouse, how you've implanted into our brains after nearly 3 years) for most of this too!


9.23.2012

Good things are coming...

I love my Cricut X, but guess what bandwagon I finally jumped on...


It will be here this week!  A big thanks to my hubby, who buys me gifts he knows I'm coveting, even when there's no occasion!

Meanwhile, I've already downloaded Silhouette Design Studio and have about a half dozen projects just waiting for the Cameo to get here.  Halloween decor, bedroom accents, labels, cards, fall decor...and even better, I officially have a craft room now too!

Happy weekend!

8.28.2012

Inexpensive DIY Carpet to Wood Stairs

Guess what?  We're moving!  The military is PCSing us once again and first the first time, we are homeowners.  We have some time, and I spent some of that time cleaning the carpets to get the house ready for real estate photos.

One thing I gave up on cleaning was this staircase.  It faces the door to the garage, so any time anyone comes in from the garage, their dirty shoes get all over this carpeted staircase.  I don't know what we were thinking putting carpet here!


Home prices just aren't what they used to be, so while I want my house to look as good as possible, I also don't want to put a lot of money into it.  I pulled off a DIY renovation all by myself for $39!

Supplies:
Dark, glossy paint:  $12
Macademia paint:  $12
Pry Bar:  $7
Make it Last!:  $4
Paint Brush:  $5
Caulk and caulk gun: on hand, but around $3 for caulk and $6 for gun at Lowe's
Pliers: On hand, but around $4 at Lowe's
Sander: On hand, but around $40 at Lowe's
Hammer:  On hand, but around $6 at Lowe's
{Yes, I realize there are 5 items you need to have on hand to stay at $39.  Or, maybe you have them plus a paintbrush and a pry bar and your total will be even less!}

{TERMS}
Step:  The flat part of the stair.  The part you step on.  The part that is dark and shiny in the final photo.
Riser:  The back of the stairs.  The vertical part in between each step.  The part painted tan in the final photo.

My two year old was "helping" :) <3

First things first.  Pry up that nasty carpet and see what we're dealing with.  Just grip the corner with the pliers and pull.   You should be able to pull it with your hands after the initial pull.

So what do we have?  Well, gaps in the wall, for one thing.  We have the carpet pad (green) and the tack bars (the wooden strips with red striping and nails sticking up).  You'll also notice that despite being covered, my stairs were textured and painted like my walls.  Score!


Prying up the carpet pad and staples is easy.  Just rip up the pad and then remove the staples with your pliers.


For the tack bar, use your pry bar to dig under the strip of wood and lever it off.  It should have nails evenly spaced- mine had about 4 per staircase width- you can remove those with a hammer after the strip is up.


I don't have photos for these next to steps.

First, take your caulk and fill in any gaps.  ABOUT CAULK:  Do NOT use silicone caulk.  You can't paint over it.

Once your caulk is dry, sand the whole staircase.  It's a pain but you don't have to do much.

Ok, back to the (blurry) photos.

Tape off the wall, the risers, basically everything around the step that you might accidentally get paint on.  This is the part I painted a dark, glossy color.  If this is your only way out of the house, do every other step and wait for them to dry before doing the opposite steps.


Once that's dry, tape off the steps above and below the risers.  I did not tape the walls since I was using the same color as my walls.  Paint your risers and let dry.

Once everything is dry, spray with Make it Last! in a fine but even mist.  That dries very quickly.


Lastly, enjoy your brand new, vacuum-free staircase!

8.14.2012

DIY Bow Back T-shirt Refashion


This is a pretty simple refashion, just takes some time.

First take your t-shirt, cut it up the back, fold it over, and sew the seam.

Next, you need to make bows.  Cut 6 rectangles (or however many you personally want) that are 7" x 8.5". The 7" is vertical, 8.5" is the horizontal side.  With right sides together, sew them into a tube, leaving one side open.  Turn them right side out and pin and sew down the side you left open.

For the bow's center, cut strips that are 3" long x 2" wide.  With wrong side up, pin over and sew down the tiniest hem you can possibly sew without eating your material.  Now, put wrong sides together again so your two vertical ends are touching, sew them together, and flip right side out so that you have a tube.

Fold your bow like it's an accordion and slip the center piece onto it.  Adjust & ruffle your bow as needed.

Pin the bows to the back of the shirt- end of the bow to the INSIDE- and sew down.

Remove pins and show off!

So this is the back:


And front- you won't see anything but black til I turn around!  That bow is just peeking out because the scoop neck is low in the front.