6.30.2012

Adult Pillowcase Nightgown Tutorial


There's a lot of patterns for pillowcase dresses and nightgowns going around.  Most seem to not use a pillowcase though!  I asked my sew-crafty friend Becca about this and she said it was actually harder to use a pillowcase when she tried it.  I had been eyeing this tutorial since from the blog's photo, I thought they were for adults and I need nightgowns in a bad way.  I don't like to wear pants or shorts to bed and the hubby is sick of me stealing his t-shirts!  I ended up sort of but not really following that link's advice and modifying a lot.

For starters, I bought 2 coordinating knit fabrics, 2 yards of each.  60" across so that was my width, and I laid a t-shirt that I liked the length of down to get my length, about 35".  I then cut the panel in half so I had a front and back piece.  Each piece was 30" wide by 35" long.

I folded each of the two panels in half- armpit to armpit- and laid them on top of each other to cut the armpit holes.  I really had no more measurements after that initial sizing measurement- I just cut a J-shape, with the long part of the J being vertical and the shorter part towards the side seams.


Next, I pinned down the armpit openings around 1/2 inch and sewed.  I then folded over the neck/back (shoulder?) areas around 2"-ish and sewed them down across the bottom.  Leave the sides open for your sash.  I did make the front piece have a larger fold down than the back piece, since I wanted it a bit lower in the front.


After I did the arm and neck/back of the front and back panels, I pinned them together (right sides facing in) and sewed down the side seams.

I did not hem the bottom.  This knit does not fray; instead it rolls up a tiny bit and I think that makes it look really cute and not in any way unfinished.

I didn't take pics of this next part, but cut a long strip- mine was 60" x 8", folded in half (right side IN) to make 60" x 4"- and sew into a tube.  Leave a spot in the middle open to pull the tube through so it's right side out and then sew that hole shut.

Thread your sash through your neck and back tunnels and voila!


Your measurements will vary depending on your size.  I'm 5'1 and this was about knee length for me.  I just wrapped the fabric around myself and figured that 60" wide would probably work, especially since the sash gathers the top part tighter than it would be otherwise.


6.28.2012

Homemade Oreo Cookies

Today, I saw a recipe on Yahoo! for homemade Oreo cookies!  I'm never going to lose the baby weight, I can tell!

I think the slew of recipes going around lately was inspired by this image:


That just makes me smile every time I see it for so many reasons.


So, on to the recipe!

I'm going to paste from the link above, since for once in my life I followed it exactly.  I will however post my photos at the end.  I baked 1 pan on a stoneware sheet and 1 on a metal sheet with wax paper.  The stoneware pan was by far superior- I was peeling bits of wax paper off of the other cookies.

This made me 100 cookies, so 50 Oreos.

I would suggest you add at least 1 extra cup of powdered sugar to the cream filling recipe for a better texture.

Just to repeat, Recipe Link!
Chocolate Wafers
Ingredients:
2 cups all purpose flour
¾ cup white sugar
3 tablespoons cocoa powder
½ teaspoon table salt
1 cup bittersweet chocolate chips
4 tablespoons unsalted butter
2 eggs
In a small bowl, whisk together the flour, sugar, cocoa powder, and salt.
In a microwave safe bowl, melt chocolate chips and butter for 30 seconds. Stir them together and microwave an additional 30 seconds. Repeat this process until chocolate and butter have both melted.
Using either a hand-held mixer with the beaters or a stand mixer with the paddle, combine melted chocolate and butter, and mix on low speed for 20 seconds.
Add eggs one at a time and mix on low speed until fully combined. Scrape down the bowl with a rubber spatula.
Add dry ingredients and mix on low speed for 10 seconds. Finish mixing with ingredients with a rubber spatula by hand.
Using two sheets of parchment paper roll out dough to 1/8-inch thickness.
Refrigerate dough for one hour or until firm.

Preheat oven to 350 degrees
Using a small round cookie cutter cut out as many rounds as possible and place one inch apart on a parchment paper lined cookie sheet. You can reroll the scraps once.
Bake for five minutes, then rotate the pan in the oven and bake an additional five minutes.
When the cookies are cool enough to handle, fill with cream filling (see directions below). Set aside for 20 minutes while the filling firms up.
Cream filling
2 sticks unsalted butter (room temperature)
1 pinch table salt
2 cups confectioner's sugar
1 teaspoon vanilla extract
Using either a hand-held mixer with the beaters or a stand mixer with the paddle, cream butter and salt at medium speed until light and fluffy
Add half the confectioner's sugar and mix on low for 30 seconds. Scrape down the bowl.
Add vanilla and mix on low for 30 seconds. Scrape down the bowl.
Gradually mix in remaining confectioners' sugar, holding some back until you reach the desired consistency. It should be smooth and spreadable, but not so runny that it will drip off the cookie.
Fill chocolate wafers with pastry bag fitted with small tip. You can also spread carefully with a knife or small spatula. A modest amount (about a teaspoon per cookie) is better so it doesn't squeeze out from between the wafers.
Cookies can be stored for up to one week in an airtight container.


Here's how I did!  Delish, but I do wish I had put extra powdered sugar in the filling.  It's more frosting-y, or icing-y, creamy anyway.


Let me know if you try it, especially if you found a way to improve the filling as I suggested!

Ivory Soap Clouds

Today we decided to try the Ivory Soap Cloud craft I saw.

It's pretty cheap- $1.19 for three bars of Ivory soap, and food coloring if you want.


Put a bar on a microwave safe dish and nuke it for about 2-2.5 minutes.  It's pretty neat to watch!

30 seconds in:


When it comes out you have a nice 'cloud' of flaky, crispy soap bits!  Also, your whole house will smell like Ivory soap!


If you want to mold it, add just a tablespoon of warm water and mix it gently.  That makes it more squishy.  You can also mix in few drops of food coloring.

I was going to break out cookie cutters, etc, as well, but sadly the kiddos were bored within minutes :(  Ah well.  On to the next craft!

6.27.2012

Quick & Easy Chocolate Cobbler

This chocolate cobbler recipe is so easy and the ingredients are so common!  You probably have everything you need already.  Cobbler is a wonderful treat.  It's a cross between a cake and a brownie and pudding, all in one!


The cobbler has two layers, but like I said, it's quick and easy, don't worry!

Bottom layer:

3/4 cup white sugar
1 cup all-purpose flour
2 tablespoons cocoa powder
1.5 teaspoons baking powder.
0.5 teaspoon salt
1/2 cup fat-free milk
3 tablespons melted butter

Mix all of this up well in a blender so that it's very, very, very creamy.

Spread evenly into a 9 x 13 baking dish.  I used a glass Pyrex one, ungreased.

Top layer:

In a clean bowl, stir together the following:

1/4 cup white sugar
1/4 cup cocoa powder
1/2 cup brown sugar

Sprinkle this mixture evenly over the top of your wet mixture.  Don't mix the two together!

Finally, add 1.5 cups of water, pouring GENTLY over the top of your cobbler.  Do not mix, do not stir, and have faith that this will work magic!  Make sure the entire top of your cobbler is covered with water.

Bake at 350 degrees for 40 minutes.

This cobbler is fantastic both hot and cold and even more fantastic with ice cream!

6.26.2012

Master List of Homemade Cleaners

I have been making my own cleaners for over a year now.  The only store-bought "cleaner" I buy is generic fragrance free fabric softener, and it's an ingredient in another cleaner anyway so it works out perfect for me.  Combine that with us making the switch to Unpaper Towels and we have saved SO much money at the store!

I get asked a LOT for my list, which I have printed & hanging up in the laundry room.  I recently made it look pretty :) So here it is!


Save this to your desktop and when you print you should see it's exactly the size of a standard piece of paper.  Very handy!

In regards to the spray cleaner solution also used in a Swiffer Wetjet bottle- boil a pot of water and then stick your empty Wetjet bottle, nozzle down, in the water for 30 seconds.  Twist off the cap with pliers, fill, and use :) No need to boil every time, it should unscrew with your hands from now on!

6.25.2012

DIY Pita Bread

Making your own pita bread is really easy and needs so few ingredients, I bet you can make them with what you have on hand!

1 tablespoon of yeast
1 teaspoon of sugar
1 teaspoon of salt
1.5 cups warm water
3 cups all purpose flour

Add the yeast, sugar, and water to your stand mixer bowl and let it sit for 10-15 minutes.  You want the yeast to be frothy and bubbly.  If your yeast doesn't "come alive" so to speak, your water may have been too hot (which kills it), not warm enough (doesn't wake it up), or you need to go buy a new can of yeast.  Don't omit the sugar- yeast eats it so it's like a little snack to get the yeast going.

Not quite done, but getting there!


In a separate bowl, mix the flour and salt.  When possible I like to use my 4 cup Pyrex glass measuring cup rather than dirty bowl a bowl and a measuring cup.


Attach your dough hook and slowly mix in the flour/salt mixture.  Keep mixing until the dough is really smooth and rides the hook.


Now take your dough out onto a floured surface and knead it well, really putting some elbow grease into it.  Knead it a LOT.  Try to make at least 5 minutes before your hands get tired!  You want the dough to be really stretchy, but not sticky.  If it's sticky add a tiny bit more flour until it stops.


Break the dough into balls.  I found that 6 balls was a good size for pitas but that's up to you.  Just remember to adjust for baking time if you go much smaller or bigger.

after you have the balls rolled out nicely, play them on a tray and flatten them with a rolling pin.  


Let these rise slightly.  It should only take about 30 minutes, although if you have your a/c going like me, you might need to play.  I throw some barely damp towels in the dryer on hot for 10 minutes, then stop the dryer and pop my trays in there and shut the door.  Otherwise my house just seems too cold for anything to rise in the summer with our a/c on.

When you think it's about time, preheat your oven to 500 degrees.  When the oven is preheated and the pitas are risen a bit, take a spatula and flip the pitas over.  Put them in the oven right after doing that.    You will bake them for about 15 minutes depending on your oven.

*Note- I used a stoneware pan for 3 pitas, which is non stick and fab.  I only have one so the other 3 pitas went on a metal pan.  I did not grease it and did not need to.

After the first 8 minutes or so you should see your pitas looking puffy!


Once they are starting to turn golden (around 15 minutes) they are done!  Let them cool, then you can slice into the pocket and stuff them (and stuff yourself!)

pre-slicing


6.24.2012

Chip It! Review

This is a short & sweet review of a nifty craft tool called Chip It!  Again let me point out, there are no ads on this blog, I have no sponsors, and I only review things that interest me and that I personally try myself.

Chip It! lets you upload a photo and it automatically finds you coordinating paint chip colors.  Obviously, you don't have to buy paint.  Maybe you're looking for coordinating fabric, as I am doing in my first example.  It's sponsored by Sherwin-Williams, hence the paint.  Maybe you ARE trying to repaint your living room- upload a pic of your rug, or couch, or a throw pillow, and see what coordinates!

Here's some fun examples to show you.  I'm not planning to repaint anything anytime soon, but I WAS looking for coordinating fabric ideas as I mentioned.


This is my bridal portrait.  In our old house I had a wall of wedding pictures framed.  I'd like to do that here and was looking for ideas for colors of frames, or maybe a painted wooden heart, or vinyl letting...not sure yet, but this does show some nice colors!


Here's a pie I baked awhile back!  M&M Cookie Pie :)


And here's a stock photo I had saved.


6.23.2012

Diana Lens for Nikon DSLR

I love my Nikon D60.  I've outgrown it, feature-wise, but it's a fantastic little starter camera and so easy to use.  I use it all the time with my son- in fact, it was my "we're finally pregnant and it's looking good!" present from my sweet husband.

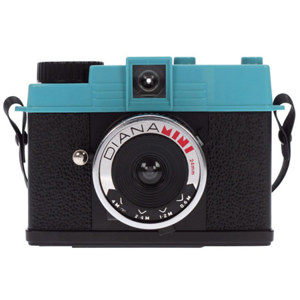
One way I can expand on the camera a bit without having to upgrade is to play with new lenses.  2 years ago I got a Diana Mini.


It's a fun little camera, with two big cons.  One, it's not a typical Diana, so the lens cannot be removed or switched.  Second, while some people are avid film lovers, I am not one of them.  I like to see my picture right away, especially with tricky cameras like the Diana.  99% of my first roll of film was either solid black or solid white, since I didn't understand the lighting yet.

So last year I purchased a Diana Lens and a Nikon Lens Mount to go with it.

I learned a few things right away.  One was my camera limitation- my camera needs AF-S lenses to focus as the body does not have a focus motor.  Therefore, I can only shoot with this lens in Manual mode.  The next thing I learned was to use the dial under the trigger to adjust the light coming in.  That made a big difference when I was getting solid white overexposed photos from too much light, or dark photos from taking pictures inside.  I just open and close this meter as needed,  but obviously you have to do it by trial and error, so moving subjects aren't the best choice to shoot with this lens.  The third thing I learned was the 3 distance stops on the lens itself- 1-2m, 2-4m, and 4m+- were there for a reason, and I zoomed accordingly which made a big difference in the focus!

I like this lens a lot, but I have a feeling if I got my hands on a Lensbaby I may not touch my Diana again.  However, the Diana was $33 and the Lensbaby is almost 10 times as much, so keep that in mind if that's a factor.

Meanwhile, here's a photo from 2 hours ago.  I love what the Diana does to colors and focus.  It's so dreamy when it comes out correctly.

Keep in mind as you look at these that the Diana lens does NOT set my flash off, as it shouldn't.


taken outdoors, mid afternoon, bright Southwestern sun in front of me


Here's one from last year, in a much lower light situation.

taken inside, no lights, window blinds closed, window facing my subject

Also from last year, one last lighting situation.

Inside, afternoon, no lights, window blind open, window in front of me behind my subject

If anyone reading this happens to have the Diana lens and mount for their DSLR, I'd love to see how your photos turn out!

6.22.2012

How to remove the cat pee smell from a couch


Sadly, this is something I have gotten good at lately.

*DISCLAIMER- if your cat is peeing outside the litter box suddenly, you need to take him/her to the vet to rule out any serious problem.  We have done this several times- our cat is fine and seems to just have an attitude.*

Once in awhile our cat will pee on our couch.  There's no trigger that we can identify.  She has several litter boxes that are kept clean and she seems to like her litter, as far as we can tell.  She goes months using it perfectly and then bam, accident.  We ruled out any sickness, bladder issues, etc.  Basically, she's just a cat, and she's vengeful.

I don't mean to brag but I am a CHAMPION at getting out the stink right now.  This morning as we were putting cushion covers back on my husband even complimented my skills at this.

Make sure your couch materials are ok for this treatment before you try it!

Here's what you need:

Laundry soap
Distilled White Vinegar
Baking soda

First:  Remove the cushion cover and throw it in the washing machine.  Do a cold rinse.  Wash on hot (if possible for your fabric) with your regular laundry soap, but put VINEGAR in the fabric softener spot.  Do a 2nd rinse after the wash and dry as needed for your fabric.

While that's in the wash, take your cushion outside.  Sprinkle baking soda over the top of it.  Now, pour distilled white vinegar all over the top as well.  The baking soda will fizz and bubble and the vinegar will get in all the cracks as it goes down into the cushion.  Leave this to dry in the sun if at all possible, rotating it vertically 90 degrees every so often.  When I do this I literally see yellow pee dripping out of the cushion.  Gross, huh?  That's why we do this outside.

When your cushion is dry, turn on your hose and RINSE RINSE RINSE all that dried baking soda out.  Dry your cushion again.  I know, it's a pain.  So is smelling cat pee every time you sit down to watch tv.

Reassemble your couch when everything is dry.

This is fail-proof for me, but tweak as needed (and let me know how you adjusted it!)

6.21.2012

Laundry Room Cabinets- organized with no costs

On my blog post about repurposing jar candles, I mentioned that I had reorganized about 6 cabinets (and used one of the jars in my laundry room cabinet when I was done).  Today I feel like showing off the laundry room cabinets :)

This is a pretty simple before and after, with a HUGE after difference!  Even better, I did not need to buy a single organizational item.  Sometimes, the best thing to do is simply to empty, purge, clean, and group together items that work together.

This is a small room to start with.  All we had was a wire shelf above the machines.  Please excuses the old photo- this was when we first moved in and before we added cabinet hardware or anything really!


One time my dad got really bored on a visit and bought 2 finished white cabinets at Lowe's for under $100.  Installing cabinets is easy if you have a helper to hold them- you literally just screw the cabinet into a stud.  They looked great!  By the way, I AM aware that buying cabinets =/= no costs...this is more about organizing these cabinets, which I've had in for over a year now and were MESSY!


However, having that space meant space to fill, and it quickly got out of control.

Here are the cabinets before:


above washing machine
This cabinet held:
Top- Odds and ends like furniture pads, shelf brackets, spare smoke alarms, etc, homemade Febreeze, paint and varnish, a first aid kid, and behind the first aid kit a small tool box and a box of home ownership papers
Bottom- cat litter, iron, big glass jar of homemade laundry soap, tub of oxyclean, starch, borax, homemade wrinkle releaser, an empty spray bottle, and Mrs. Meyers liquid detergent


above dryer

This cabinet held:
Top- swiffer wet pads, rags, rarely used kitchen cleaners like grout sealer and marble polish
Bottom- cat food, rags, plastic bags, hand vac attachments, and more often used cleaners like toilet bowl scrub and magic erasers

On the door on the right is a list of how to make all of the homemade cleaners that I use & love.


After emptying, purging, cleaning, and grouping, it looks so much better!


SO MUCH BETTER!  I then used my Cricut and black vinyl to label a few things and called it done!

above washing machine

Now the top left has all home stuff- tool kit, first aid, paintbrushes, spare trim & wall paint, shelf brackets, etc.  Rarely used cleaners are grouped together on the top shelf as well.

Bottom left has all laundry and cloth-related cleaners- Homemade febreeze & wrinkle releaserr, homemade laundry soap, etc.  The other half of the bottom shelf holds dryer sheets, the oven, and my homemade All Purpose Cleaner, which is there to be easily accessible since I use it daily.


I kept the cat items to the left of this cabinet.  I reach for her litter less than her food, so litter went up top.  Normally when I feed her I end up hand vacuuming up some mess, so the hand vac goes with her food (and attachments next to it that you can't see).  Next to the hand vac are often-used cleaners like Swiffer wet pads, magic erasers, and toilet cleaners.  Above those cleaners are rags.  On the door is still my list of how to make the homemade cleaners that I use & love.

Here are some of the items I labeled with my Cricut in doing this organizational project!


Of course the safety pops aren't in this cabinet- just re-using the photo from my jar candle repurpose :)

Happy organizing- happy wallet too!


6.19.2012

Homemade Granola Bars

We love granola bars around here!  A box of 42 can disappear in a week.  I thought making a batch as needed would be easier and maybe cheaper- we'll see!


Granola Bar Recipe:

1 cup of rice krispy cereal
2 cups of quick oats (traditional oats will NOT work.  Also,  you could sub this for 2 cups of loose granola but I haven't tried that)

Mix those together and set aside.

In a pot, combine:

1/2 cup brown sugar
1/4 cup honey
1/4 cup butter
1.5 cups marshmellows

Heat on medium until everything is smooth and combined.  Leave it on the heat until you see bubbles, almost like it's boiling.  This is necessary to get the oats to cook and stick together.

Pour the wet mixture over the dry mixture and stir stir stir!

In an ungreased pan (mine was a Pyrex pan about 10x8.5 or so) pour your mixture.  Spray a spatula with Pam and use it to press, press, press, and press again.  You need to pack this TIGHTLY.

Sprinkle a handful of mini chocolate chips over the top and gently press down with your spatula so they stick..

Let cool for about 2 hours.  I usually refrigerate it after the first hour.

Slice into bars and enjoy!  These ARE shelf stable, but I find they stay together as bars better in the fridge and they still taste great!

*Have fun mixing and matching ingredients!  I've heard great things about adding peanut butter to the pot, raisins to the dry mixture, peanut butter or butterscotch chips, etc.


Removing old candle wax from jars


Today I cleaned out and reorganized 4 cabinets in my kitchen and 2 cabinets in my laundry room.  I'll have before & after pics up soon!  However, in my cabinet purge, I came across a bunch of jar candles that I haven't burned in months.  2 of them didn't have much wax left and rather than throw them away I thought  that maybe I could re-purpose the jars.  First I had to get that wax out!

I read that there were two methods.  One was to put the jar inside a pot of boiling water until the wax melts. However...then what?  It's not like I can pour it down the drain.  Method 2 seemed better.  Method two is to pour boiling water into the jar, letting all the wax melt and float to the top, and then removing it once it hardens.

Ok, so here's what I started with.


I boiled water...

Yeah, you probably didn't need a visual, right?

I placed the candles into brownie pans because I was afraid of hot water = broken glass.  No worries though, it didn't happen!

Pour the water into the jars once it's boiling.

After a minute or two you can already see melted wax float to the top!


In my experience it took about 90 minutes to cool and the wax was solid, but somewhat soft.  That was perfect.

Here you can see one jar has all the wax at the top- the other one, not so much.


For the jar that worked 100%, I just took a butter knife and ran it along the edges, and then as it flipped sideways I just bent it and pulled it all out.


For the second jar, I pulled out what had floated to the top, and then resigned myself to having to boil the rest of the wax.  I set up a pot of boiling water and placed this jar in the middle.


Since there'd be no water to pour out, I decided the best thing to do was pour the wax into something that could be thrown away.  

A small cup lined with tinfoil was perfect.  Once all the wax inside that jar was liquid, I carefully poured it into my makeshift disposable container.


Once the wax hardened I just balled it up and threw it away!

Next, the jars got a bath to remove soot & soak off labels.


While that was soaking, I attempted to shape the wax I removed into something that could be used in a tart warmer.


Perfect size!

The jars then got a good scrub to clean them nicely and remove labels.

I turned on my trusty Cricut.


And voila!  One went into my newly purged and reorganized laundry cabinet.  The other went into my newly purged and reorganized junk cabinet (which is no longer junky!)


6.30.2012

Adult Pillowcase Nightgown Tutorial


There's a lot of patterns for pillowcase dresses and nightgowns going around.  Most seem to not use a pillowcase though!  I asked my sew-crafty friend Becca about this and she said it was actually harder to use a pillowcase when she tried it.  I had been eyeing this tutorial since from the blog's photo, I thought they were for adults and I need nightgowns in a bad way.  I don't like to wear pants or shorts to bed and the hubby is sick of me stealing his t-shirts!  I ended up sort of but not really following that link's advice and modifying a lot.

For starters, I bought 2 coordinating knit fabrics, 2 yards of each.  60" across so that was my width, and I laid a t-shirt that I liked the length of down to get my length, about 35".  I then cut the panel in half so I had a front and back piece.  Each piece was 30" wide by 35" long.

I folded each of the two panels in half- armpit to armpit- and laid them on top of each other to cut the armpit holes.  I really had no more measurements after that initial sizing measurement- I just cut a J-shape, with the long part of the J being vertical and the shorter part towards the side seams.


Next, I pinned down the armpit openings around 1/2 inch and sewed.  I then folded over the neck/back (shoulder?) areas around 2"-ish and sewed them down across the bottom.  Leave the sides open for your sash.  I did make the front piece have a larger fold down than the back piece, since I wanted it a bit lower in the front.


After I did the arm and neck/back of the front and back panels, I pinned them together (right sides facing in) and sewed down the side seams.

I did not hem the bottom.  This knit does not fray; instead it rolls up a tiny bit and I think that makes it look really cute and not in any way unfinished.

I didn't take pics of this next part, but cut a long strip- mine was 60" x 8", folded in half (right side IN) to make 60" x 4"- and sew into a tube.  Leave a spot in the middle open to pull the tube through so it's right side out and then sew that hole shut.

Thread your sash through your neck and back tunnels and voila!


Your measurements will vary depending on your size.  I'm 5'1 and this was about knee length for me.  I just wrapped the fabric around myself and figured that 60" wide would probably work, especially since the sash gathers the top part tighter than it would be otherwise.


6.28.2012

Homemade Oreo Cookies

Today, I saw a recipe on Yahoo! for homemade Oreo cookies!  I'm never going to lose the baby weight, I can tell!

I think the slew of recipes going around lately was inspired by this image:


That just makes me smile every time I see it for so many reasons.


So, on to the recipe!

I'm going to paste from the link above, since for once in my life I followed it exactly.  I will however post my photos at the end.  I baked 1 pan on a stoneware sheet and 1 on a metal sheet with wax paper.  The stoneware pan was by far superior- I was peeling bits of wax paper off of the other cookies.

This made me 100 cookies, so 50 Oreos.

I would suggest you add at least 1 extra cup of powdered sugar to the cream filling recipe for a better texture.

Just to repeat, Recipe Link!
Chocolate Wafers
Ingredients:
2 cups all purpose flour
¾ cup white sugar
3 tablespoons cocoa powder
½ teaspoon table salt
1 cup bittersweet chocolate chips
4 tablespoons unsalted butter
2 eggs
In a small bowl, whisk together the flour, sugar, cocoa powder, and salt.
In a microwave safe bowl, melt chocolate chips and butter for 30 seconds. Stir them together and microwave an additional 30 seconds. Repeat this process until chocolate and butter have both melted.
Using either a hand-held mixer with the beaters or a stand mixer with the paddle, combine melted chocolate and butter, and mix on low speed for 20 seconds.
Add eggs one at a time and mix on low speed until fully combined. Scrape down the bowl with a rubber spatula.
Add dry ingredients and mix on low speed for 10 seconds. Finish mixing with ingredients with a rubber spatula by hand.
Using two sheets of parchment paper roll out dough to 1/8-inch thickness.
Refrigerate dough for one hour or until firm.

Preheat oven to 350 degrees
Using a small round cookie cutter cut out as many rounds as possible and place one inch apart on a parchment paper lined cookie sheet. You can reroll the scraps once.
Bake for five minutes, then rotate the pan in the oven and bake an additional five minutes.
When the cookies are cool enough to handle, fill with cream filling (see directions below). Set aside for 20 minutes while the filling firms up.
Cream filling
2 sticks unsalted butter (room temperature)
1 pinch table salt
2 cups confectioner's sugar
1 teaspoon vanilla extract
Using either a hand-held mixer with the beaters or a stand mixer with the paddle, cream butter and salt at medium speed until light and fluffy
Add half the confectioner's sugar and mix on low for 30 seconds. Scrape down the bowl.
Add vanilla and mix on low for 30 seconds. Scrape down the bowl.
Gradually mix in remaining confectioners' sugar, holding some back until you reach the desired consistency. It should be smooth and spreadable, but not so runny that it will drip off the cookie.
Fill chocolate wafers with pastry bag fitted with small tip. You can also spread carefully with a knife or small spatula. A modest amount (about a teaspoon per cookie) is better so it doesn't squeeze out from between the wafers.
Cookies can be stored for up to one week in an airtight container.


Here's how I did!  Delish, but I do wish I had put extra powdered sugar in the filling.  It's more frosting-y, or icing-y, creamy anyway.


Let me know if you try it, especially if you found a way to improve the filling as I suggested!

Ivory Soap Clouds

Today we decided to try the Ivory Soap Cloud craft I saw.

It's pretty cheap- $1.19 for three bars of Ivory soap, and food coloring if you want.


Put a bar on a microwave safe dish and nuke it for about 2-2.5 minutes.  It's pretty neat to watch!

30 seconds in:


When it comes out you have a nice 'cloud' of flaky, crispy soap bits!  Also, your whole house will smell like Ivory soap!


If you want to mold it, add just a tablespoon of warm water and mix it gently.  That makes it more squishy.  You can also mix in few drops of food coloring.

I was going to break out cookie cutters, etc, as well, but sadly the kiddos were bored within minutes :(  Ah well.  On to the next craft!

6.27.2012

Quick & Easy Chocolate Cobbler

This chocolate cobbler recipe is so easy and the ingredients are so common!  You probably have everything you need already.  Cobbler is a wonderful treat.  It's a cross between a cake and a brownie and pudding, all in one!


The cobbler has two layers, but like I said, it's quick and easy, don't worry!

Bottom layer:

3/4 cup white sugar
1 cup all-purpose flour
2 tablespoons cocoa powder
1.5 teaspoons baking powder.
0.5 teaspoon salt
1/2 cup fat-free milk
3 tablespons melted butter

Mix all of this up well in a blender so that it's very, very, very creamy.

Spread evenly into a 9 x 13 baking dish.  I used a glass Pyrex one, ungreased.

Top layer:

In a clean bowl, stir together the following:

1/4 cup white sugar
1/4 cup cocoa powder
1/2 cup brown sugar

Sprinkle this mixture evenly over the top of your wet mixture.  Don't mix the two together!

Finally, add 1.5 cups of water, pouring GENTLY over the top of your cobbler.  Do not mix, do not stir, and have faith that this will work magic!  Make sure the entire top of your cobbler is covered with water.

Bake at 350 degrees for 40 minutes.

This cobbler is fantastic both hot and cold and even more fantastic with ice cream!

6.26.2012

Master List of Homemade Cleaners

I have been making my own cleaners for over a year now.  The only store-bought "cleaner" I buy is generic fragrance free fabric softener, and it's an ingredient in another cleaner anyway so it works out perfect for me.  Combine that with us making the switch to Unpaper Towels and we have saved SO much money at the store!

I get asked a LOT for my list, which I have printed & hanging up in the laundry room.  I recently made it look pretty :) So here it is!


Save this to your desktop and when you print you should see it's exactly the size of a standard piece of paper.  Very handy!

In regards to the spray cleaner solution also used in a Swiffer Wetjet bottle- boil a pot of water and then stick your empty Wetjet bottle, nozzle down, in the water for 30 seconds.  Twist off the cap with pliers, fill, and use :) No need to boil every time, it should unscrew with your hands from now on!

6.25.2012

DIY Pita Bread

Making your own pita bread is really easy and needs so few ingredients, I bet you can make them with what you have on hand!

1 tablespoon of yeast
1 teaspoon of sugar
1 teaspoon of salt
1.5 cups warm water
3 cups all purpose flour

Add the yeast, sugar, and water to your stand mixer bowl and let it sit for 10-15 minutes.  You want the yeast to be frothy and bubbly.  If your yeast doesn't "come alive" so to speak, your water may have been too hot (which kills it), not warm enough (doesn't wake it up), or you need to go buy a new can of yeast.  Don't omit the sugar- yeast eats it so it's like a little snack to get the yeast going.

Not quite done, but getting there!


In a separate bowl, mix the flour and salt.  When possible I like to use my 4 cup Pyrex glass measuring cup rather than dirty bowl a bowl and a measuring cup.


Attach your dough hook and slowly mix in the flour/salt mixture.  Keep mixing until the dough is really smooth and rides the hook.


Now take your dough out onto a floured surface and knead it well, really putting some elbow grease into it.  Knead it a LOT.  Try to make at least 5 minutes before your hands get tired!  You want the dough to be really stretchy, but not sticky.  If it's sticky add a tiny bit more flour until it stops.


Break the dough into balls.  I found that 6 balls was a good size for pitas but that's up to you.  Just remember to adjust for baking time if you go much smaller or bigger.

after you have the balls rolled out nicely, play them on a tray and flatten them with a rolling pin.  


Let these rise slightly.  It should only take about 30 minutes, although if you have your a/c going like me, you might need to play.  I throw some barely damp towels in the dryer on hot for 10 minutes, then stop the dryer and pop my trays in there and shut the door.  Otherwise my house just seems too cold for anything to rise in the summer with our a/c on.

When you think it's about time, preheat your oven to 500 degrees.  When the oven is preheated and the pitas are risen a bit, take a spatula and flip the pitas over.  Put them in the oven right after doing that.    You will bake them for about 15 minutes depending on your oven.

*Note- I used a stoneware pan for 3 pitas, which is non stick and fab.  I only have one so the other 3 pitas went on a metal pan.  I did not grease it and did not need to.

After the first 8 minutes or so you should see your pitas looking puffy!


Once they are starting to turn golden (around 15 minutes) they are done!  Let them cool, then you can slice into the pocket and stuff them (and stuff yourself!)

pre-slicing


6.24.2012

Chip It! Review

This is a short & sweet review of a nifty craft tool called Chip It!  Again let me point out, there are no ads on this blog, I have no sponsors, and I only review things that interest me and that I personally try myself.

Chip It! lets you upload a photo and it automatically finds you coordinating paint chip colors.  Obviously, you don't have to buy paint.  Maybe you're looking for coordinating fabric, as I am doing in my first example.  It's sponsored by Sherwin-Williams, hence the paint.  Maybe you ARE trying to repaint your living room- upload a pic of your rug, or couch, or a throw pillow, and see what coordinates!

Here's some fun examples to show you.  I'm not planning to repaint anything anytime soon, but I WAS looking for coordinating fabric ideas as I mentioned.


This is my bridal portrait.  In our old house I had a wall of wedding pictures framed.  I'd like to do that here and was looking for ideas for colors of frames, or maybe a painted wooden heart, or vinyl letting...not sure yet, but this does show some nice colors!


Here's a pie I baked awhile back!  M&M Cookie Pie :)


And here's a stock photo I had saved.


6.23.2012

Diana Lens for Nikon DSLR

I love my Nikon D60.  I've outgrown it, feature-wise, but it's a fantastic little starter camera and so easy to use.  I use it all the time with my son- in fact, it was my "we're finally pregnant and it's looking good!" present from my sweet husband.

One way I can expand on the camera a bit without having to upgrade is to play with new lenses.  2 years ago I got a Diana Mini.


It's a fun little camera, with two big cons.  One, it's not a typical Diana, so the lens cannot be removed or switched.  Second, while some people are avid film lovers, I am not one of them.  I like to see my picture right away, especially with tricky cameras like the Diana.  99% of my first roll of film was either solid black or solid white, since I didn't understand the lighting yet.

So last year I purchased a Diana Lens and a Nikon Lens Mount to go with it.

I learned a few things right away.  One was my camera limitation- my camera needs AF-S lenses to focus as the body does not have a focus motor.  Therefore, I can only shoot with this lens in Manual mode.  The next thing I learned was to use the dial under the trigger to adjust the light coming in.  That made a big difference when I was getting solid white overexposed photos from too much light, or dark photos from taking pictures inside.  I just open and close this meter as needed,  but obviously you have to do it by trial and error, so moving subjects aren't the best choice to shoot with this lens.  The third thing I learned was the 3 distance stops on the lens itself- 1-2m, 2-4m, and 4m+- were there for a reason, and I zoomed accordingly which made a big difference in the focus!

I like this lens a lot, but I have a feeling if I got my hands on a Lensbaby I may not touch my Diana again.  However, the Diana was $33 and the Lensbaby is almost 10 times as much, so keep that in mind if that's a factor.

Meanwhile, here's a photo from 2 hours ago.  I love what the Diana does to colors and focus.  It's so dreamy when it comes out correctly.

Keep in mind as you look at these that the Diana lens does NOT set my flash off, as it shouldn't.


taken outdoors, mid afternoon, bright Southwestern sun in front of me


Here's one from last year, in a much lower light situation.

taken inside, no lights, window blinds closed, window facing my subject

Also from last year, one last lighting situation.

Inside, afternoon, no lights, window blind open, window in front of me behind my subject

If anyone reading this happens to have the Diana lens and mount for their DSLR, I'd love to see how your photos turn out!

6.22.2012

How to remove the cat pee smell from a couch


Sadly, this is something I have gotten good at lately.

*DISCLAIMER- if your cat is peeing outside the litter box suddenly, you need to take him/her to the vet to rule out any serious problem.  We have done this several times- our cat is fine and seems to just have an attitude.*

Once in awhile our cat will pee on our couch.  There's no trigger that we can identify.  She has several litter boxes that are kept clean and she seems to like her litter, as far as we can tell.  She goes months using it perfectly and then bam, accident.  We ruled out any sickness, bladder issues, etc.  Basically, she's just a cat, and she's vengeful.

I don't mean to brag but I am a CHAMPION at getting out the stink right now.  This morning as we were putting cushion covers back on my husband even complimented my skills at this.

Make sure your couch materials are ok for this treatment before you try it!

Here's what you need:

Laundry soap
Distilled White Vinegar
Baking soda

First:  Remove the cushion cover and throw it in the washing machine.  Do a cold rinse.  Wash on hot (if possible for your fabric) with your regular laundry soap, but put VINEGAR in the fabric softener spot.  Do a 2nd rinse after the wash and dry as needed for your fabric.

While that's in the wash, take your cushion outside.  Sprinkle baking soda over the top of it.  Now, pour distilled white vinegar all over the top as well.  The baking soda will fizz and bubble and the vinegar will get in all the cracks as it goes down into the cushion.  Leave this to dry in the sun if at all possible, rotating it vertically 90 degrees every so often.  When I do this I literally see yellow pee dripping out of the cushion.  Gross, huh?  That's why we do this outside.

When your cushion is dry, turn on your hose and RINSE RINSE RINSE all that dried baking soda out.  Dry your cushion again.  I know, it's a pain.  So is smelling cat pee every time you sit down to watch tv.

Reassemble your couch when everything is dry.

This is fail-proof for me, but tweak as needed (and let me know how you adjusted it!)

6.21.2012

Laundry Room Cabinets- organized with no costs

On my blog post about repurposing jar candles, I mentioned that I had reorganized about 6 cabinets (and used one of the jars in my laundry room cabinet when I was done).  Today I feel like showing off the laundry room cabinets :)

This is a pretty simple before and after, with a HUGE after difference!  Even better, I did not need to buy a single organizational item.  Sometimes, the best thing to do is simply to empty, purge, clean, and group together items that work together.

This is a small room to start with.  All we had was a wire shelf above the machines.  Please excuses the old photo- this was when we first moved in and before we added cabinet hardware or anything really!


One time my dad got really bored on a visit and bought 2 finished white cabinets at Lowe's for under $100.  Installing cabinets is easy if you have a helper to hold them- you literally just screw the cabinet into a stud.  They looked great!  By the way, I AM aware that buying cabinets =/= no costs...this is more about organizing these cabinets, which I've had in for over a year now and were MESSY!


However, having that space meant space to fill, and it quickly got out of control.

Here are the cabinets before:


above washing machine
This cabinet held:
Top- Odds and ends like furniture pads, shelf brackets, spare smoke alarms, etc, homemade Febreeze, paint and varnish, a first aid kid, and behind the first aid kit a small tool box and a box of home ownership papers
Bottom- cat litter, iron, big glass jar of homemade laundry soap, tub of oxyclean, starch, borax, homemade wrinkle releaser, an empty spray bottle, and Mrs. Meyers liquid detergent


above dryer

This cabinet held:
Top- swiffer wet pads, rags, rarely used kitchen cleaners like grout sealer and marble polish
Bottom- cat food, rags, plastic bags, hand vac attachments, and more often used cleaners like toilet bowl scrub and magic erasers

On the door on the right is a list of how to make all of the homemade cleaners that I use & love.


After emptying, purging, cleaning, and grouping, it looks so much better!


SO MUCH BETTER!  I then used my Cricut and black vinyl to label a few things and called it done!

above washing machine

Now the top left has all home stuff- tool kit, first aid, paintbrushes, spare trim & wall paint, shelf brackets, etc.  Rarely used cleaners are grouped together on the top shelf as well.

Bottom left has all laundry and cloth-related cleaners- Homemade febreeze & wrinkle releaserr, homemade laundry soap, etc.  The other half of the bottom shelf holds dryer sheets, the oven, and my homemade All Purpose Cleaner, which is there to be easily accessible since I use it daily.


I kept the cat items to the left of this cabinet.  I reach for her litter less than her food, so litter went up top.  Normally when I feed her I end up hand vacuuming up some mess, so the hand vac goes with her food (and attachments next to it that you can't see).  Next to the hand vac are often-used cleaners like Swiffer wet pads, magic erasers, and toilet cleaners.  Above those cleaners are rags.  On the door is still my list of how to make the homemade cleaners that I use & love.

Here are some of the items I labeled with my Cricut in doing this organizational project!


Of course the safety pops aren't in this cabinet- just re-using the photo from my jar candle repurpose :)

Happy organizing- happy wallet too!


6.19.2012

Homemade Granola Bars

We love granola bars around here!  A box of 42 can disappear in a week.  I thought making a batch as needed would be easier and maybe cheaper- we'll see!


Granola Bar Recipe:

1 cup of rice krispy cereal
2 cups of quick oats (traditional oats will NOT work.  Also,  you could sub this for 2 cups of loose granola but I haven't tried that)

Mix those together and set aside.

In a pot, combine:

1/2 cup brown sugar
1/4 cup honey
1/4 cup butter
1.5 cups marshmellows

Heat on medium until everything is smooth and combined.  Leave it on the heat until you see bubbles, almost like it's boiling.  This is necessary to get the oats to cook and stick together.

Pour the wet mixture over the dry mixture and stir stir stir!

In an ungreased pan (mine was a Pyrex pan about 10x8.5 or so) pour your mixture.  Spray a spatula with Pam and use it to press, press, press, and press again.  You need to pack this TIGHTLY.

Sprinkle a handful of mini chocolate chips over the top and gently press down with your spatula so they stick..

Let cool for about 2 hours.  I usually refrigerate it after the first hour.

Slice into bars and enjoy!  These ARE shelf stable, but I find they stay together as bars better in the fridge and they still taste great!

*Have fun mixing and matching ingredients!  I've heard great things about adding peanut butter to the pot, raisins to the dry mixture, peanut butter or butterscotch chips, etc.


Removing old candle wax from jars


Today I cleaned out and reorganized 4 cabinets in my kitchen and 2 cabinets in my laundry room.  I'll have before & after pics up soon!  However, in my cabinet purge, I came across a bunch of jar candles that I haven't burned in months.  2 of them didn't have much wax left and rather than throw them away I thought  that maybe I could re-purpose the jars.  First I had to get that wax out!

I read that there were two methods.  One was to put the jar inside a pot of boiling water until the wax melts. However...then what?  It's not like I can pour it down the drain.  Method 2 seemed better.  Method two is to pour boiling water into the jar, letting all the wax melt and float to the top, and then removing it once it hardens.

Ok, so here's what I started with.


I boiled water...

Yeah, you probably didn't need a visual, right?

I placed the candles into brownie pans because I was afraid of hot water = broken glass.  No worries though, it didn't happen!

Pour the water into the jars once it's boiling.

After a minute or two you can already see melted wax float to the top!


In my experience it took about 90 minutes to cool and the wax was solid, but somewhat soft.  That was perfect.

Here you can see one jar has all the wax at the top- the other one, not so much.


For the jar that worked 100%, I just took a butter knife and ran it along the edges, and then as it flipped sideways I just bent it and pulled it all out.


For the second jar, I pulled out what had floated to the top, and then resigned myself to having to boil the rest of the wax.  I set up a pot of boiling water and placed this jar in the middle.


Since there'd be no water to pour out, I decided the best thing to do was pour the wax into something that could be thrown away.  

A small cup lined with tinfoil was perfect.  Once all the wax inside that jar was liquid, I carefully poured it into my makeshift disposable container.


Once the wax hardened I just balled it up and threw it away!

Next, the jars got a bath to remove soot & soak off labels.


While that was soaking, I attempted to shape the wax I removed into something that could be used in a tart warmer.


Perfect size!

The jars then got a good scrub to clean them nicely and remove labels.

I turned on my trusty Cricut.


And voila!  One went into my newly purged and reorganized laundry cabinet.  The other went into my newly purged and reorganized junk cabinet (which is no longer junky!)