I have gotten pretty bad at keeping this up. Honestly, I'm a little overwhelmed by the e-mails I get about a few reviews I've done, and more than once I've been contacted about free products to try but that really isn't my thing. I started this blog because when Pinterest exploded I realized how few truly impartial reviews are out there. I'm human and what may work for me may not work for you, and vice versa, but I'm happy to post honest, unbiased, unsponsored reviews of anything that catches my eye (when I actually do it anyway!).
So we left off here in my attempt to DIY red velvet hair. I was testing the effectiveness of Manic Panic bleach, as all I was getting was a dark brown plum color and not bright red. I had brought Pravana Vivids hair color and strand tested it several times but it just was not going to work without pre lightening. Well, even on the spot on bleached in that last post, it didn't stick! I can't tell you how sad I was. Pravana has amazing reviews.
I kept googling around and kept coming across L'oreal Hicolor Hilights for Dark Hair (not an affiliate link). I had seen some bloggers who again just got a red tint, though better than any tint I managed in the past, and some who got gorgeous, nearly Ariel hair color. I bought a tube of Magenta and a tube of Red at Sally's for around $5 each, plus a bottle of Orero Developer in 30 Volume for under $4. Pay attention to the box- you want Hicolor Hilights, but it's wonderful for doing your whole head. I already had a mixing bowl and gloves, and if you like to use a brush, you need one of those too. I can say from several strand tests and several root retouch sessions that there is no color difference on my hair between Red and Magenta.
The box says 2.4 oz developer to 1 tube color, but I didn't feeling like dealing with that, so I just eyeballed 2.5 in my bowl (which is labeled 1, 2, 3, 4, 5, 6, no halves or quarters or .4s) and squeezed out the color tube. I mix it up with a leftover chopstick until there are no red lumps, put on my gloves, and spread it all over my head. Even when doing root growth I will still do all over color to brighten it up. When my hair is saturated I will put it in a ponytail and hit it with the blow dryer for 5 minutes. I then put a plastic bag over my hair and wrap the whole thing in a towel. 15 minutes later I will blow dry for 5 more minutes over the bag and then rewrap the towel for 15 more minutes, at which point I rinse. I rinse in cold water and it's mostly clear after 5 minutes. I then condition, usually with Aussie 3 Minute Miracle Moist, rinse that out, and go on my way.
To maintain, well, I really don't. After the initial rinse I start taking hot showers again and I shower almost every day, 2 bad things for maintaining red, but this really doesn't fade. I use Ulta's Red shampoo, conditioner, and every week or so the color depositing glaze from that line (not affiliate links), but it seems like a red-brown stain, and maybe that's why I lose vibrancy but not color? Maybe I won't use the glaze for the next 6 weeks and compare. I've also used a volumizing shampoo and a hotel shampoo without any issues, and if I really want my hair to look great or just every so often for hair health I will use Aussie 3 Minute Miracle Moist again.
It loses its shocking vibrancy over time, but not it's red color. I hope the pics I will be showing you in a sec will help make that clear. It does not fade to gingery-bleachy-auburny-browny-ick. I do a root touchup and a head refresh every 6 weeks or so. For that, I do the same thing as I've already described, but skip the heat since my roots take to color better than my length (has to do with the heat of your scalp and your type of virgin hair, because of hair type you may or may not have similar results with that method).
As for staining- I do not do a Vaseline barrier on my hairline/ears, but this has never stained my skin after I rinse everything off. This does leave a red tint on my shower floor, but if I pour bleach over it and let it sit for 10 minutes and then rinse, that tint is gone. It will stain towels/clothes when it's in it's dye form, but I've had no issues with wet hair post-dye transferring to bed sheets, clothing, etc. My shower water never runs 100% clear but the pink tint that still rinses out is so faint that you probably won't notice if you aren't looking for it.
Ok on to photos. Please note- how the red color is NOT ginger after 6 weeks, and how dark brown my roots are. While this product is mixed with a developer, I didn't have to pre-lighten it or bleach it or anything harsh like that. My hair is remarkable undamaged after all it's initial abuse and now regular use of this product.
Please also note...would you call this magenta? I wouldn't. That's why I noted I saw no color difference. Red and Magenta look the same on me. I haven't tried any other colors. I would love a darker, more magenta color for real, but I'm happy with this! Photos taken in same window-less bathroom about 1 hour apart. I will update with weekly photos over the next 6 weeks to show on the vibrancy and color changes over that time, and I will not use the color depositing glaze I mentioned just in case that affected things.
Showing posts with label sally. Show all posts
7.16.2014
8.04.2013
Print and Cut Magnets with the Silhouette Cameo
My son has a Mickey Mouse magnet board and randomly asked me (after we'd been to the mall and several other stores today) for Cars and Turbo magnets to go on it as well. Luckily I found a pack of Avery magnet paper that I bought who knows when, and voila!
Well it wasn't quite "voila." I had to find all the images (and nice clean ones without tons of background to mess up the trace), save them, open them one by one, trace them, and get them arranged before printing and cutting. All the images were hunted down via Google Images.
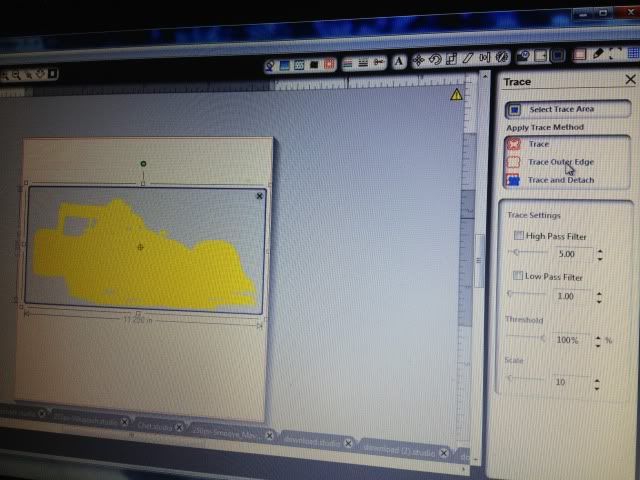
Once open, you have to trace them to get cut lines. I normally make the image really large, erase anything I don't want (like a logo in the corner), and trace it by turning off High Pass Filter, bumping up the threshold into the 90s, and then hitting "Trace Outer Edge." Below you can see my settings to trace Francesco. By hitting Trace Outer Edge it only traces the outer edge as stated, so that white area inside his tail will NOT cut. If you want to cut out the details like that, hit Trace, not Trace Outer Edge. I figured that the tail probably wouldn't be that sturdy and this is for a 3 year old so I stuck with the edge.
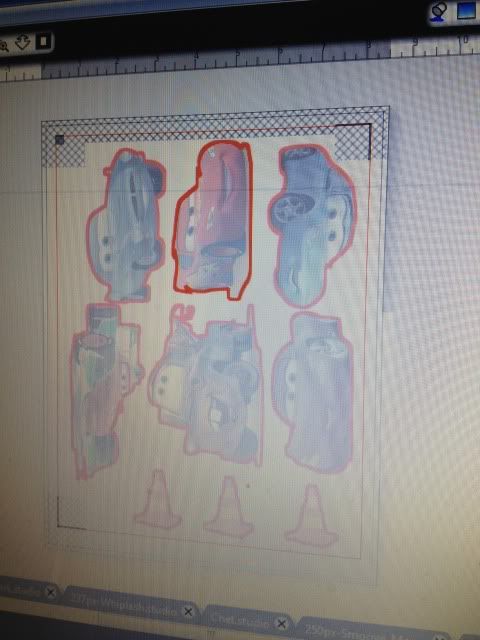
Arrange everything on your paper- letter size as the magnet paper is, as registration marks on. I then hit the cut line window just to double check that all the cut lines are turned on.
Now he's occupied playing again. Score!
Well it wasn't quite "voila." I had to find all the images (and nice clean ones without tons of background to mess up the trace), save them, open them one by one, trace them, and get them arranged before printing and cutting. All the images were hunted down via Google Images.
Once open, you have to trace them to get cut lines. I normally make the image really large, erase anything I don't want (like a logo in the corner), and trace it by turning off High Pass Filter, bumping up the threshold into the 90s, and then hitting "Trace Outer Edge." Below you can see my settings to trace Francesco. By hitting Trace Outer Edge it only traces the outer edge as stated, so that white area inside his tail will NOT cut. If you want to cut out the details like that, hit Trace, not Trace Outer Edge. I figured that the tail probably wouldn't be that sturdy and this is for a 3 year old so I stuck with the edge.
Arrange everything on your paper- letter size as the magnet paper is, as registration marks on. I then hit the cut line window just to double check that all the cut lines are turned on.
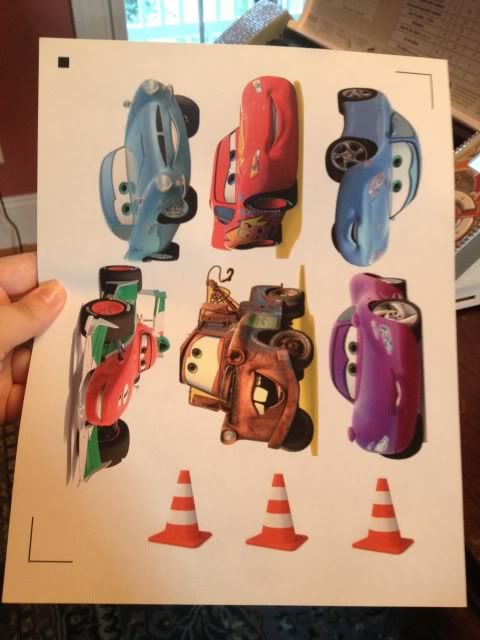
And print! I set my Preferences to "Best." The instructions for magnet paper say inkjet printers only.
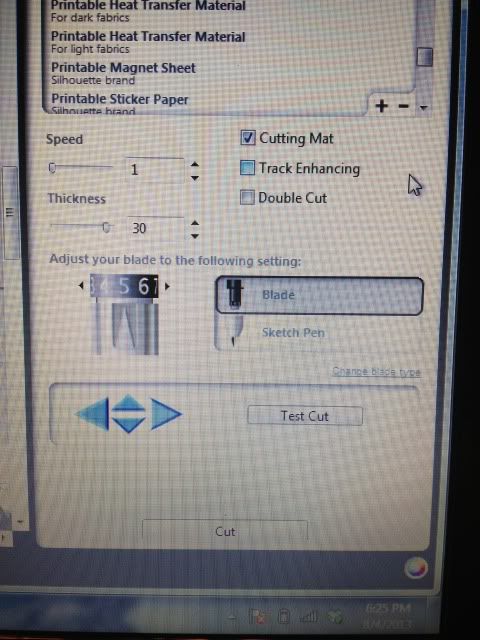
Now on to cutting. After scanning registration marks, I set it to the preset magnet paper settings, but I bump up the blade from 4 to 5.
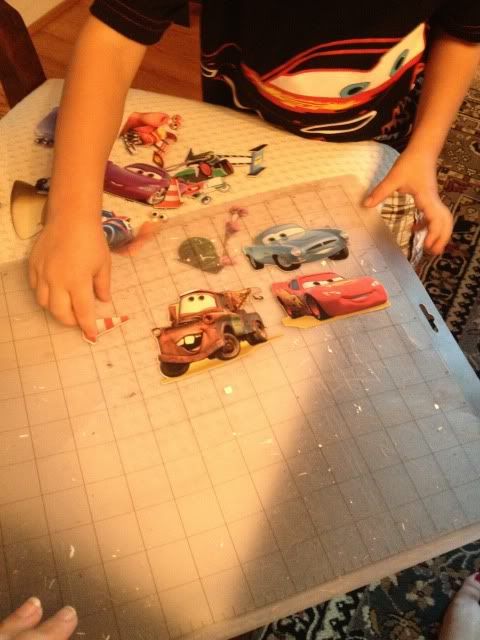
After cutting...well, this is the best photo I could get! My son was so excited that I made something just for him and he couldn't wait to take them off the mat- all by himself of course.
Now he's occupied playing again. Score!
Subscribe to:
Posts (Atom)
Showing posts with label sally. Show all posts
7.16.2014
Red Velvet hair for next to no cost at home
I have gotten pretty bad at keeping this up. Honestly, I'm a little overwhelmed by the e-mails I get about a few reviews I've done, and more than once I've been contacted about free products to try but that really isn't my thing. I started this blog because when Pinterest exploded I realized how few truly impartial reviews are out there. I'm human and what may work for me may not work for you, and vice versa, but I'm happy to post honest, unbiased, unsponsored reviews of anything that catches my eye (when I actually do it anyway!).
So we left off here in my attempt to DIY red velvet hair. I was testing the effectiveness of Manic Panic bleach, as all I was getting was a dark brown plum color and not bright red. I had brought Pravana Vivids hair color and strand tested it several times but it just was not going to work without pre lightening. Well, even on the spot on bleached in that last post, it didn't stick! I can't tell you how sad I was. Pravana has amazing reviews.
I kept googling around and kept coming across L'oreal Hicolor Hilights for Dark Hair (not an affiliate link). I had seen some bloggers who again just got a red tint, though better than any tint I managed in the past, and some who got gorgeous, nearly Ariel hair color. I bought a tube of Magenta and a tube of Red at Sally's for around $5 each, plus a bottle of Orero Developer in 30 Volume for under $4. Pay attention to the box- you want Hicolor Hilights, but it's wonderful for doing your whole head. I already had a mixing bowl and gloves, and if you like to use a brush, you need one of those too. I can say from several strand tests and several root retouch sessions that there is no color difference on my hair between Red and Magenta.
The box says 2.4 oz developer to 1 tube color, but I didn't feeling like dealing with that, so I just eyeballed 2.5 in my bowl (which is labeled 1, 2, 3, 4, 5, 6, no halves or quarters or .4s) and squeezed out the color tube. I mix it up with a leftover chopstick until there are no red lumps, put on my gloves, and spread it all over my head. Even when doing root growth I will still do all over color to brighten it up. When my hair is saturated I will put it in a ponytail and hit it with the blow dryer for 5 minutes. I then put a plastic bag over my hair and wrap the whole thing in a towel. 15 minutes later I will blow dry for 5 more minutes over the bag and then rewrap the towel for 15 more minutes, at which point I rinse. I rinse in cold water and it's mostly clear after 5 minutes. I then condition, usually with Aussie 3 Minute Miracle Moist, rinse that out, and go on my way.
To maintain, well, I really don't. After the initial rinse I start taking hot showers again and I shower almost every day, 2 bad things for maintaining red, but this really doesn't fade. I use Ulta's Red shampoo, conditioner, and every week or so the color depositing glaze from that line (not affiliate links), but it seems like a red-brown stain, and maybe that's why I lose vibrancy but not color? Maybe I won't use the glaze for the next 6 weeks and compare. I've also used a volumizing shampoo and a hotel shampoo without any issues, and if I really want my hair to look great or just every so often for hair health I will use Aussie 3 Minute Miracle Moist again.
It loses its shocking vibrancy over time, but not it's red color. I hope the pics I will be showing you in a sec will help make that clear. It does not fade to gingery-bleachy-auburny-browny-ick. I do a root touchup and a head refresh every 6 weeks or so. For that, I do the same thing as I've already described, but skip the heat since my roots take to color better than my length (has to do with the heat of your scalp and your type of virgin hair, because of hair type you may or may not have similar results with that method).
As for staining- I do not do a Vaseline barrier on my hairline/ears, but this has never stained my skin after I rinse everything off. This does leave a red tint on my shower floor, but if I pour bleach over it and let it sit for 10 minutes and then rinse, that tint is gone. It will stain towels/clothes when it's in it's dye form, but I've had no issues with wet hair post-dye transferring to bed sheets, clothing, etc. My shower water never runs 100% clear but the pink tint that still rinses out is so faint that you probably won't notice if you aren't looking for it.
Ok on to photos. Please note- how the red color is NOT ginger after 6 weeks, and how dark brown my roots are. While this product is mixed with a developer, I didn't have to pre-lighten it or bleach it or anything harsh like that. My hair is remarkable undamaged after all it's initial abuse and now regular use of this product.
Please also note...would you call this magenta? I wouldn't. That's why I noted I saw no color difference. Red and Magenta look the same on me. I haven't tried any other colors. I would love a darker, more magenta color for real, but I'm happy with this! Photos taken in same window-less bathroom about 1 hour apart. I will update with weekly photos over the next 6 weeks to show on the vibrancy and color changes over that time, and I will not use the color depositing glaze I mentioned just in case that affected things.
8.04.2013
Print and Cut Magnets with the Silhouette Cameo
My son has a Mickey Mouse magnet board and randomly asked me (after we'd been to the mall and several other stores today) for Cars and Turbo magnets to go on it as well. Luckily I found a pack of Avery magnet paper that I bought who knows when, and voila!
Well it wasn't quite "voila." I had to find all the images (and nice clean ones without tons of background to mess up the trace), save them, open them one by one, trace them, and get them arranged before printing and cutting. All the images were hunted down via Google Images.
Once open, you have to trace them to get cut lines. I normally make the image really large, erase anything I don't want (like a logo in the corner), and trace it by turning off High Pass Filter, bumping up the threshold into the 90s, and then hitting "Trace Outer Edge." Below you can see my settings to trace Francesco. By hitting Trace Outer Edge it only traces the outer edge as stated, so that white area inside his tail will NOT cut. If you want to cut out the details like that, hit Trace, not Trace Outer Edge. I figured that the tail probably wouldn't be that sturdy and this is for a 3 year old so I stuck with the edge.
Arrange everything on your paper- letter size as the magnet paper is, as registration marks on. I then hit the cut line window just to double check that all the cut lines are turned on.
Now he's occupied playing again. Score!
Well it wasn't quite "voila." I had to find all the images (and nice clean ones without tons of background to mess up the trace), save them, open them one by one, trace them, and get them arranged before printing and cutting. All the images were hunted down via Google Images.
Once open, you have to trace them to get cut lines. I normally make the image really large, erase anything I don't want (like a logo in the corner), and trace it by turning off High Pass Filter, bumping up the threshold into the 90s, and then hitting "Trace Outer Edge." Below you can see my settings to trace Francesco. By hitting Trace Outer Edge it only traces the outer edge as stated, so that white area inside his tail will NOT cut. If you want to cut out the details like that, hit Trace, not Trace Outer Edge. I figured that the tail probably wouldn't be that sturdy and this is for a 3 year old so I stuck with the edge.
Arrange everything on your paper- letter size as the magnet paper is, as registration marks on. I then hit the cut line window just to double check that all the cut lines are turned on.
And print! I set my Preferences to "Best." The instructions for magnet paper say inkjet printers only.
Now on to cutting. After scanning registration marks, I set it to the preset magnet paper settings, but I bump up the blade from 4 to 5.
After cutting...well, this is the best photo I could get! My son was so excited that I made something just for him and he couldn't wait to take them off the mat- all by himself of course.
Now he's occupied playing again. Score!
Subscribe to:
Posts (Atom)