Showing posts with label tree. Show all posts

4.24.2013

Happy spring & a tire swing

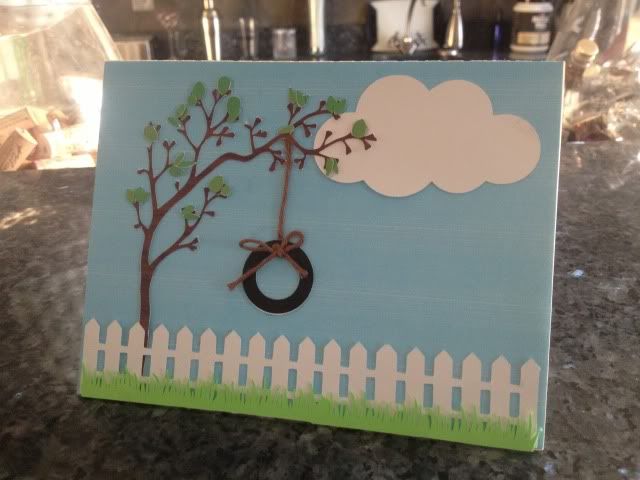
I have barely looked at my Cameo since I found out I was pregnant in January.  I've played with the software, dreamed of what I'm going to make for the holidays in our new house, thought about what I can make for the new baby to wear, etc...very little actual crafting however.  That will probably change for my baby shower next month, but for now, I just made this cute little card.

Every shape is in the Silhouette store and the only colored paper I used was the green grass; the rest is all print & cut, even the background.  I needed a birthday card for someone and liked the idea of a white picket fence, but not a house since it wasn't for a housewarming.  I had the string laying around and even though I cut cardstock "rope" I changed my mind and I like the string much better :)

This is my favorite part of owning a Cameo over a Cricut (which I still have..)- I can browse the online store, buy a single shape that I like, mix & match all of my shapes, resize, color, edit, and make a digital template, then print it, cut it, and put it together, without getting up or going to the store!


Shape links:

The card itself is this card's shape minus all embellishments, and then I just made a square the same size as the front half and print & cut it blue

I placed the leaves one by one by first putting small glue dots all over where I wanted the leaves, and then using the Pick Me Up tool, placed them one by one easily & quickly over the glue dots.

The birthday girl liked it so much that she wants me to make her 24 random cards, blank inside, and pay me of course :) Guess I'll be busy on the Cameo after all!

11.30.2012

3D JOY Display

I am a member of the Silhouette Flickr group and I keep seeing these cute 3D word displays from Needles n Knowledge.  First she did one with the word "Spooky" and then "Thankful."  Her latest is "Joy."  Jodi is very nice and answered several questions I had about her "Thankful" display but I ended up deciding that it was just too long of a word and I felt overwhelmed looking at the cuts.

When I saw her "Joy" display I decided to give that one a try.  Only 3 letters, can't be that bad, right?

All I can say is, Jodi has the patience of a saint.

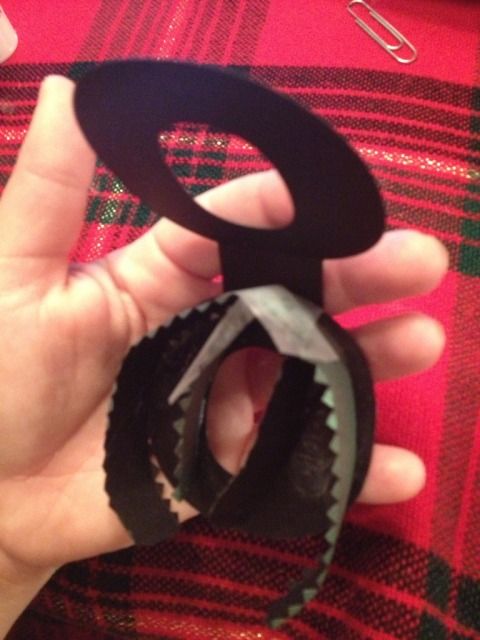
3D letters are probably my least fun thing to ever assemble.  Especially curved ones like the J and the O.  The Y wasn't too awful.  It's also very time consuming to glue together zig zag edges and wait til they are sturdy enough to glue more zig zag edges, not to mention trying to put pressure on a hollow 3D letter when you are gluing it together...eek!

All 3 letters are from the Sil store (I just searched 3D letters).  I made the J as large as it would fit on a 12x12" page, turning it diagonally to get it even bigger.  The Y was resized to be about 1/2 the J and the box under the Y was meant to be the other half of the J, size-wise, but it came up a little short so I used corrugated cardboard to quickly make a sweater box (maybe?) so it looks like a stack of presents and balances out the J.  The O was sized to match the top half of the Y.

After those were cut, I used the Silhouette Knife Tool to slice all the tabs and stuff off of the letters so I just had a flat J and Y (I don't need the O for this part).  I used the line tool to fill in any missing lines, pattern filled them with the argyle (J) and holly/berry pattern (Y) and used the Print & Cut feature.  I then glued these to the front of the J and the Y.

For the O, I downloaded  a wreath in the Silhouette Store and cut every layer out of print and cut in different shades of green with one layer being a pattern that had berries.  The bow was color filled in red and print & cut at the same time.  I like to stick as much on a sheet as I can when I do print & cut!  I also downloaded a 3D Star, color filled it yellow, and,  you guessed it, print & cut!

The bow and the tree pieces were cut out of green paper (different papers) and the box was cut at the same time I cut the Y, since they both fit on a 12x12 paper.  In fact, the box is from the "BOO" display I made in October!  I just erased the B and voila, plain box.  The base of the tree I filled with a wood pattern and again utilized the print & cut feature.

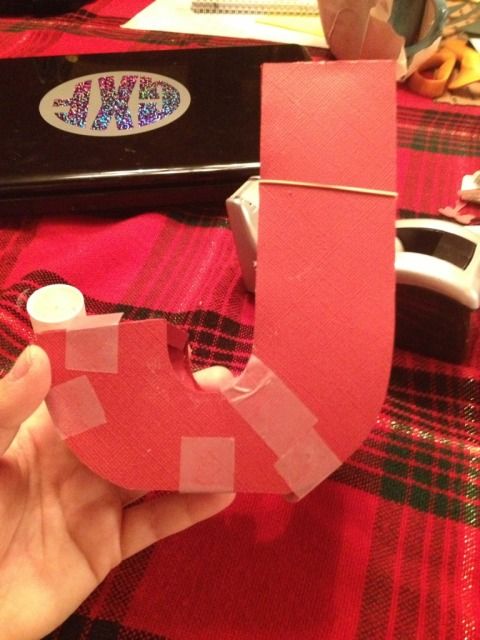
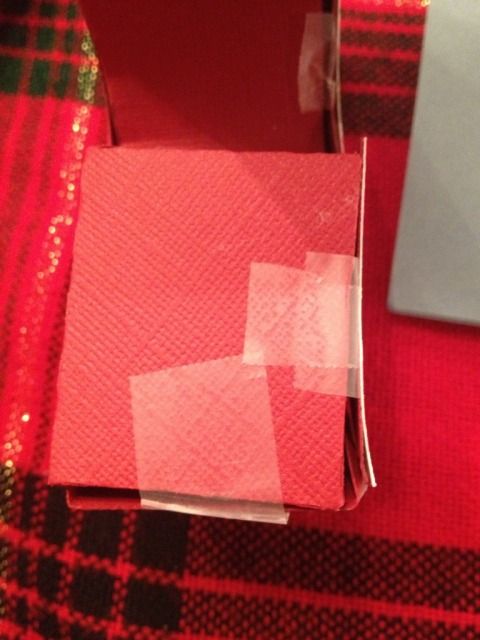
So...everything is cut.  I already mentioned what a pain in the butt it is to put together these letters.  Here's some in-process photos.  Yes, I gave up and started trying to discretely use tape.


The most noticeable pieces of tape were going to be on the end of the J where the tree rests.  The tree just wouldn't hide it that well. 


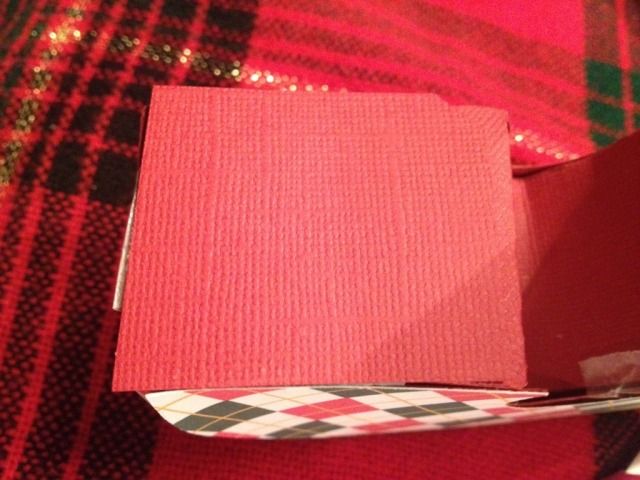
I cut a square of that same red paper and used spray glue because at that point I was hating my glue stick.


Not perfect, but this is the angle that looks the worst.

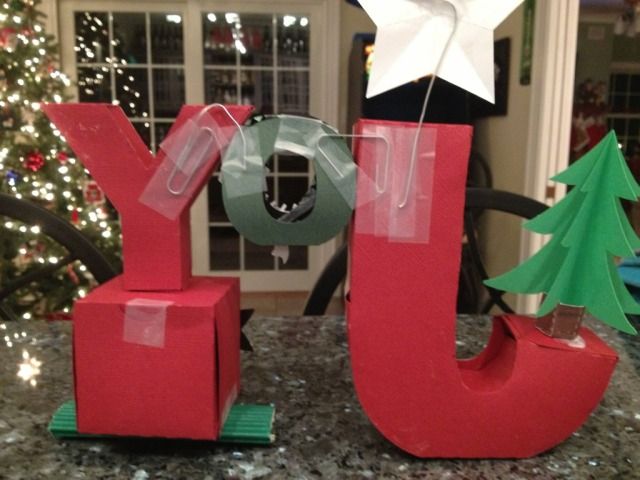
Now I had to figure out how to get the letters stuck together.  Glue was an obvious choice, except you can't put pressure on hollow paper letters.  Both sides of the O had to stick to the J and the Y and it just didn't seem like it would work.

I came up with an idea, and it works very nicely, but it looks completely awful from the back.


Yep.  Paperclips.  Also, I see the glue on the tree isn't dry yet, which reminds me, I totally found that liquid white school glue works VERY nicely when you can't put pressure on something, but it doesn't dry all that fast which can be a problem.

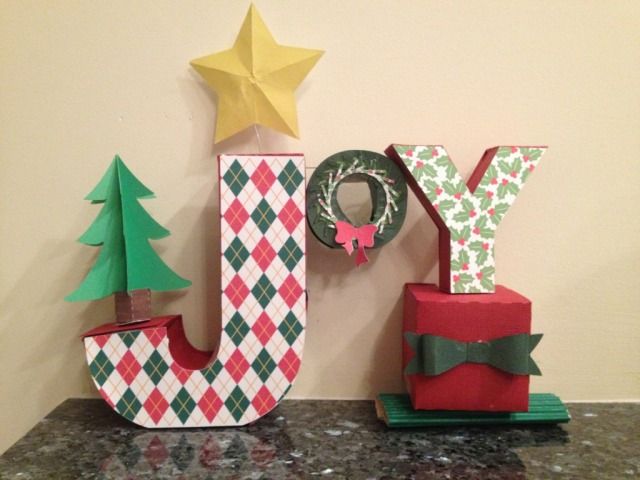
So, about 3.5 hours later, 2 pieces of green paper, 2 pieces of red paper, 1 piece of printable card stock, and some corrugated green cardboard later, we have....


Is it perfect?  No.  Is it real?  100%.  I'm not paid by Silhouette, endorsed by Needles n Knowledge, on any design teams, or anything like that.  I'm just a mom who really, really likes Print & Cut because I never have card stock on hand.  

I may tweak some things, including more branches on the wreath, making the corrugated card board look nicer, and some other minor changes, but on the other hand, I'm kind of done with this sucker now.  

I recommend finding wooden or even the paper mache type letters at craft stores, assuming they have sizing that you like, and decorating those with Silhouette designs.  They will be sturdier and therefore last longer (hopefully) and you won't have to worry about assembling them.

Also, I am looking for recommendations on glue if you make lots of 3D crafts like this!  I have Scotch Crafter's Glue Stick and some 3M Spray Glue, but maybe some of my assembly problems are bad glue choices?  What do you think?


Showing posts with label tree. Show all posts

4.24.2013

Happy spring & a tire swing

I have barely looked at my Cameo since I found out I was pregnant in January.  I've played with the software, dreamed of what I'm going to make for the holidays in our new house, thought about what I can make for the new baby to wear, etc...very little actual crafting however.  That will probably change for my baby shower next month, but for now, I just made this cute little card.

Every shape is in the Silhouette store and the only colored paper I used was the green grass; the rest is all print & cut, even the background.  I needed a birthday card for someone and liked the idea of a white picket fence, but not a house since it wasn't for a housewarming.  I had the string laying around and even though I cut cardstock "rope" I changed my mind and I like the string much better :)

This is my favorite part of owning a Cameo over a Cricut (which I still have..)- I can browse the online store, buy a single shape that I like, mix & match all of my shapes, resize, color, edit, and make a digital template, then print it, cut it, and put it together, without getting up or going to the store!


Shape links:

The card itself is this card's shape minus all embellishments, and then I just made a square the same size as the front half and print & cut it blue

I placed the leaves one by one by first putting small glue dots all over where I wanted the leaves, and then using the Pick Me Up tool, placed them one by one easily & quickly over the glue dots.

The birthday girl liked it so much that she wants me to make her 24 random cards, blank inside, and pay me of course :) Guess I'll be busy on the Cameo after all!

11.30.2012

3D JOY Display

I am a member of the Silhouette Flickr group and I keep seeing these cute 3D word displays from Needles n Knowledge.  First she did one with the word "Spooky" and then "Thankful."  Her latest is "Joy."  Jodi is very nice and answered several questions I had about her "Thankful" display but I ended up deciding that it was just too long of a word and I felt overwhelmed looking at the cuts.

When I saw her "Joy" display I decided to give that one a try.  Only 3 letters, can't be that bad, right?

All I can say is, Jodi has the patience of a saint.

3D letters are probably my least fun thing to ever assemble.  Especially curved ones like the J and the O.  The Y wasn't too awful.  It's also very time consuming to glue together zig zag edges and wait til they are sturdy enough to glue more zig zag edges, not to mention trying to put pressure on a hollow 3D letter when you are gluing it together...eek!

All 3 letters are from the Sil store (I just searched 3D letters).  I made the J as large as it would fit on a 12x12" page, turning it diagonally to get it even bigger.  The Y was resized to be about 1/2 the J and the box under the Y was meant to be the other half of the J, size-wise, but it came up a little short so I used corrugated cardboard to quickly make a sweater box (maybe?) so it looks like a stack of presents and balances out the J.  The O was sized to match the top half of the Y.

After those were cut, I used the Silhouette Knife Tool to slice all the tabs and stuff off of the letters so I just had a flat J and Y (I don't need the O for this part).  I used the line tool to fill in any missing lines, pattern filled them with the argyle (J) and holly/berry pattern (Y) and used the Print & Cut feature.  I then glued these to the front of the J and the Y.

For the O, I downloaded  a wreath in the Silhouette Store and cut every layer out of print and cut in different shades of green with one layer being a pattern that had berries.  The bow was color filled in red and print & cut at the same time.  I like to stick as much on a sheet as I can when I do print & cut!  I also downloaded a 3D Star, color filled it yellow, and,  you guessed it, print & cut!

The bow and the tree pieces were cut out of green paper (different papers) and the box was cut at the same time I cut the Y, since they both fit on a 12x12 paper.  In fact, the box is from the "BOO" display I made in October!  I just erased the B and voila, plain box.  The base of the tree I filled with a wood pattern and again utilized the print & cut feature.

So...everything is cut.  I already mentioned what a pain in the butt it is to put together these letters.  Here's some in-process photos.  Yes, I gave up and started trying to discretely use tape.


The most noticeable pieces of tape were going to be on the end of the J where the tree rests.  The tree just wouldn't hide it that well. 


I cut a square of that same red paper and used spray glue because at that point I was hating my glue stick.


Not perfect, but this is the angle that looks the worst.

Now I had to figure out how to get the letters stuck together.  Glue was an obvious choice, except you can't put pressure on hollow paper letters.  Both sides of the O had to stick to the J and the Y and it just didn't seem like it would work.

I came up with an idea, and it works very nicely, but it looks completely awful from the back.


Yep.  Paperclips.  Also, I see the glue on the tree isn't dry yet, which reminds me, I totally found that liquid white school glue works VERY nicely when you can't put pressure on something, but it doesn't dry all that fast which can be a problem.

So, about 3.5 hours later, 2 pieces of green paper, 2 pieces of red paper, 1 piece of printable card stock, and some corrugated green cardboard later, we have....


Is it perfect?  No.  Is it real?  100%.  I'm not paid by Silhouette, endorsed by Needles n Knowledge, on any design teams, or anything like that.  I'm just a mom who really, really likes Print & Cut because I never have card stock on hand.  

I may tweak some things, including more branches on the wreath, making the corrugated card board look nicer, and some other minor changes, but on the other hand, I'm kind of done with this sucker now.  

I recommend finding wooden or even the paper mache type letters at craft stores, assuming they have sizing that you like, and decorating those with Silhouette designs.  They will be sturdier and therefore last longer (hopefully) and you won't have to worry about assembling them.

Also, I am looking for recommendations on glue if you make lots of 3D crafts like this!  I have Scotch Crafter's Glue Stick and some 3M Spray Glue, but maybe some of my assembly problems are bad glue choices?  What do you think?